redis主从复制准备工作
1
2
3
4
5
6
7
8
9
10
11
12
13
14
15
16
17
18
19
20
21
22
23
24
25
26
27
28
29
30
31
32
33
34
35
36
37
38
39
40
41
42
43
44
45
46
47
48
49
50
51
52
53
54
55
56
57
58
59
60
61
| 使用rsync服务将db01目录下已经编译好的redis安装目录推送到从节点db02上。
[root@db01 ~]
检查db02:
[root@db02 ~]
/application/redis_cluster/
├── redis -> /application/redis_cluster/redis-5.0.5/
├── redis-3.2.12
├── redis-5.0.5
└── redis_6379
修改配置文件:
[root@db02 ~]
daemonize yes
bind 10.0.0.52 127.0.0.1 //更改ip
port 6379
pidfile /application/redis_cluster/redis_6379/pid/redis_6379.pid
logfile /application/redis_cluster/redis_6379/logs/redis_6379.log
databases 16
dbfilename redis_6379.rdb
dir /data/redis_cluster/redis_6379
save 60 1000
appendonly yes
appendfsync everysec
创建持久化数据目录:
[root@db02 ~]
添加环境变量:
[root@db02 ~]
export PATH=/application/redis_cluster/redis/src:$PATH
EOF
[root@db02 ~]
Redis server v=5.0.5 sha=00000000:0 malloc=jemalloc-5.1.0 bits=64 build=80d2ef2db5b4103a
启动:
[root@db02 ~]
[root@db02 ~]
● redis6379.service - Redis
Loaded: loaded (/usr/lib/systemd/system/redis6379.service; enabled; vendor preset: disabled)
Active: active (running) since 一 2020-05-11 13:50:05 CST; 14s ago
Main PID: 7657 (redis-server)
CGroup: /system.slice/redis6379.service
└─7657 /application/redis_cluster/redis/src/redis-server 10.0.0.52:6379
5月 11 13:50:05 db02 systemd[1]: Started Redis.
[root@db02 ~]
root 7657 1 0 13:50 ? 00:00:00 /application/redis_cluster/redis/src/redis-server 10.0.0.52:6379
root 7664 7500 0 13:50 pts/0 00:00:00 grep --color=auto redis
[root@db02 ~]
127.0.0.1:6379> keys *
(empty list or set)
|
redis systemd管理:Redis Systemd
回顾mysql开启主从复制步骤
- 2.1打开binlog,建立复制授权用户
- 2.2server id不同
- 2.3主库数据导出 mysqldump xtrabackup
-
--master-data=2
-
--singxZxdasd-xasd=1
- 2.4从库数据导入
- 2.5配置主从参数
- 2.6yes 延迟
Redis主从复制
介绍
- 在分布式系统中为了解决单点问题,通常会把数据复制多个副本到其他机器,满足故障恢复和负载均衡等求.Redis 也是如此,提供了复制功能.
- 复制功能是高可用 Redis 的基础,哨兵和集群都是在复制的基础上实现高可用的.
建立复制
每个从节点只能有一个主节点,主节点可以有多个从节点.
配置复制的方式有三种:
- 1.在配置文件中加入
slaveof {masterHost} {masterPort} 随 redis 启动生效.
- 2.在 redis-server 启动命令后加入
—slaveof {masterHost} {masterPort}生效.
- 3.直接使用命令:
slaveof {masterHost} {masterPort}生效.不推荐
查看复制状态信息命令
Info replication
断开复制
Slaveof 命令不但可以建立复制,还可以在从节点执行 slaveof no one 来断开与主节点复制关系.
断开复制主要流程:
- 1.断开与主节点复制关系
- 2.从节点晋升为主节点
- 从节点断开复制后不会抛弃原有数据,只是无法再获取主节点上的数据变化.
- 通过 slaveof 命令还可以实现切主操作,所谓切主是指把当前从节点对主节点的复制切换到另一个主节点.执行 slaveof {newMasterIp} {newMasterPort}命令即可.
切主操作流程如下:
- 1.断开与旧主节点的复制关系
- 2.与新主节点建立复制关系
- 3.删除从节点当前所有数据
- 4.对新主节点进行复制操作
提示: 线上操作一定要小心,因为切主后会清空之前所有的数据.
Redis主从复制工作过程
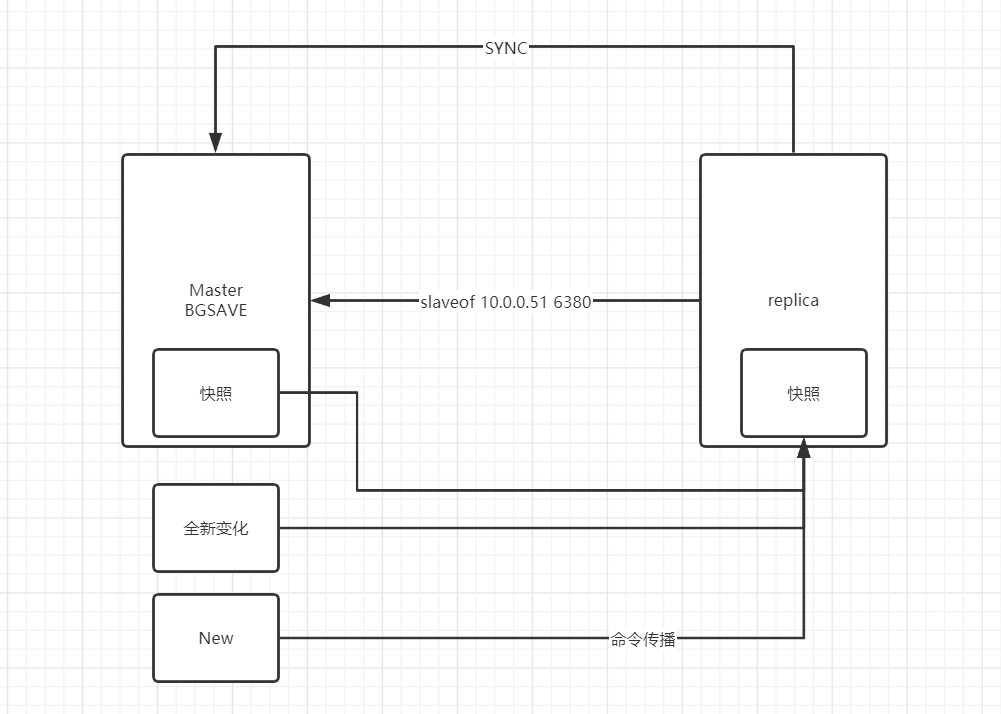
- 1 从库向主库发起同步请求
- 2 主库接收到从库的同步请求
- 3 主库开始bgsave生成rdb文件
- 4 主库生成完之后,保存到磁盘成功
- 5 主库将RDB文件发送给从库
- 6 从库接收主库的RDB文件
- 7 从库清空自己所有的数据
- 8 从库将接受的RDB文件载入到内存中
1
2
3
4
5
6
7
8
9
10
11
12
| //主库中插入数据
[root@db01 ~]
//从库执行slaveof
127.0.0.1:6379> keys *
(empty list or set)
127.0.0.1:6379> slaveof 10.0.0.51 6379
OK
127.0.0.1:6379> keys *
1) "k_1399"
2) "k_1479"
...
|
危险操作:
如果主库不小心同步了空的从库,会导致主库数据全部丢失
谨慎的操作流程:
- 1.在配置文件里配置slaveof参数,不要热更新配置
- 2.主库主动执行bgsave保存rdb文件,然后备份一份rdb文件
恢复操作:
- 1.主库停止复制关系,注释掉aof相关参数
- 2.停止主库
- 3.删除原有的rdb数据,重命名备份的rdb文件
- 4.重新启动主库,将rdb文件导入到内存里
redis数据恢复
redis持久化数据备份
1
2
3
4
5
6
7
| [root@db01 ~]
-rw-r--r-- 1 root root 27967 5月 11 14:41 /data/redis_cluster/redis_6379/redis_6379.rdb
[root@db01 ~]
c9fec881d05c4282fb0e3ae4bf725a83 /data/redis_cluster/redis_6379/redis_6379.rdb
[root@db01 ~]
[root@db01 ~]
c9fec881d05c4282fb0e3ae4bf725a83 /data/redis_cluster/redis_6379/redis_6379.rdb.bak
|
redis数据恢复过程
1
2
3
4
5
6
7
8
9
10
11
12
13
14
15
16
| 1.停止db01的redis服务
[root@db01 ~]
[root@db01 ~]
2.注释掉配置文件中的主从关系,并替换持久化数据为全备
[root@db01 ~]
cp:是否覆盖"/data/redis_cluster/redis_6379/redis_6379.rdb"? y
[root@db01 ~]
[root@db01 ~]
root 933 1 0 15:33 ? 00:00:00 /application/redis_cluster/redis/src/redis-server 10.0.0.51:6379
root 938 861 0 15:33 pts/0 00:00:00 grep --color=auto redis
[root@db01 ~]
127.0.0.1:6379> keys *
1) "k_238"
2) "k_329"
...
|
主库故障解决流程
1
2
3
4
5
6
7
8
9
10
11
12
13
14
15
16
17
18
19
20
21
22
23
24
25
26
27
28
29
30
31
32
33
| redis-cli
SLAVEOF 10.0.0.51 6379
[root@db02 ~]
redis-cli shutdown
从库db02slaveof no one取消复制关系
redis-cli -h db02 -p 6379 slaveof no one
cd /data/redis_cluster/redis_6379
cp redis_6379.rdb redis_6379.rdb.bak
redis-server /opt/redis_cluster/redis_6379/conf/redis_6379.conf
SLAVEOF 10.0.0.52 6379
keys *
SLAVEOF no one
SLAVEOF 10.0.0.51 6379
|
Redis哨兵
哨兵介绍
Sentinel 介绍
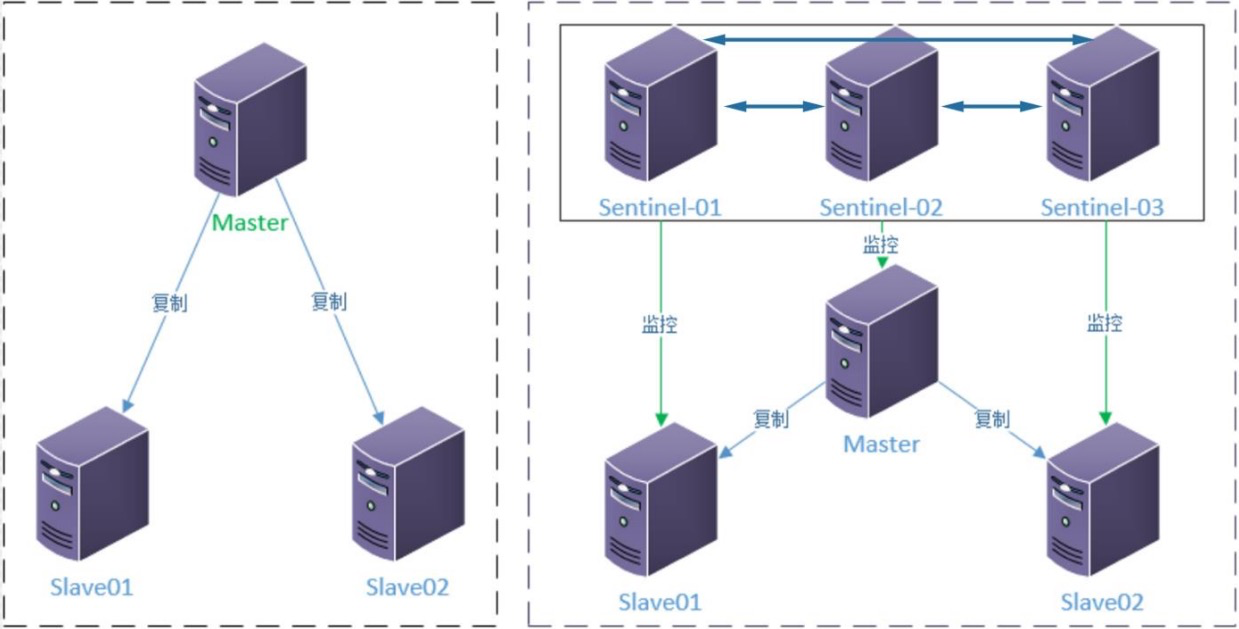
- Redis 的主从模式下,主节点一旦发生故障不能提供服务,需要人工干预,将从节点晋升为主节点,同时还需要修改客户端配置。对于很多应用场景这种方式无法接受。
- Sentinel(哨兵)架构解决了 redis 主从人工干预的问题。
- Redis Sentinel 是 redis 的高可用实现方案,实际生产环境中,对提高整个系统可用性非常有帮助的。
哨兵主要功能
Redis Sentinel 是一个分布式系统, Redis Sentinel 为 Redis 提供高可用性。可以在没有人为干预的
情况下阻止某种类型的故障。
Redis 的 Sentinel 系统用于管理多个 Redis 服务器(instance)该系统执行以下三个任务:
- 监控(Monitoring):
- Sentinel 会不断地定期检查你的主服务器和从服务器是否运作正常。
- 提醒(Notification):
- 当被监控的某个 Redis 服务器出现问题时, Sentinel 可以通过 API 向管理员或者其他应用程序发送通知。
- 自动故障迁移(Automatic failover):
当一个主服务器不能正常工作时, Sentinel 会开始一次自动故障迁移操作, 它会将失效主服务器的其中一个从
服务器升级为新的主服务器, 并让失效主服务器的其他从服务器改为复制新的主服务器; 当客户端试图连接失
效的主服务器时, 集群也会向客户端返回新主服务器的地址, 使得集群可以使用新主服务器代替失效服务器
架构图:

架构规划
| 角色 |
IP |
端口 |
| Master |
10.0.0.51 |
6379 |
| Sentinel-01 |
26379 |
| Master |
10.0.0.52 |
6379 |
| Sentinel-01 |
26379 |
| Master |
10.0.0.53 |
6379 |
| Sentinel-01 |
26379 |
安装配置命令
哨兵是基于主从复制,所以需要先部署好主从复制
手工操作步骤如下:
- 先配置和创建好 1 台服务器的节点和哨兵
- 使用 rsync 传输到另外 2 台机器
- 修改另外两台机器的 IP 地址
建议使用 ansible 剧本批量部署
环境准备
1
2
3
4
5
6
7
8
9
10
11
12
13
14
15
16
17
18
19
20
21
22
23
24
25
26
27
28
29
30
31
32
33
34
35
36
37
38
39
40
41
42
43
44
45
46
|
[root@db01 ~]
[root@db01 ~]
[root@db03 ~]
[root@db03 ~]
mkdir -p /data/redis_cluster/redis_26379
mkdir -p /application/redis_cluster/redis_26379/{conf,pid,logs}
cat > /application/redis_cluster/redis_26379/conf/redis_26379.conf<<EOF
bind $(ifconfig enp0s8|awk 'NR==2{print $2}')
port 26379
daemonize yes
logfile /application/redis_cluster/redis_26379/logs/redis_26379.log
dir /data/redis_cluster/redis_26379
sentinel monitor mymaster 10.0.0.51 6379 2
#mymaster 主节点别名 主节点 ip 和端口,判断主节点失败,两个 sentinel 节点同意
sentinel down-after-milliseconds mymaster 3000
#选项指定了 Sentinel 认为服务器已经断线所需的毫秒数。
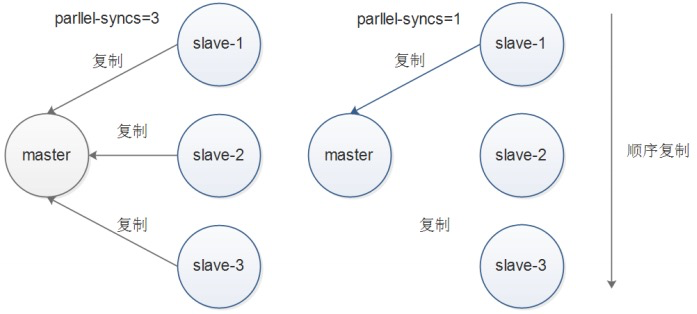
sentinel parallel-syncs mymaster 1
#向新的主节点发起复制操作的从节点个数,1 轮询发起复制
sentinel failover-timeout mymaster 18000
#故障转移超时时间
EOF
[root@db01 ~]
127.0.0.1:6379>
[root@db02 ~]
127.0.0.1:6379> SLAVEOF 10.0.0.51 6379
OK
[root@db02 ~]
1) "slaveof"
2) "10.0.0.51 6379"
[root@db03 ~]
127.0.0.1:6379> SLAVEOF 10.0.0.51 6379
OK
[root@db03 ~]
1) "slaveof"
2) "10.0.0.51 6379"
|
启动哨兵
1
2
3
4
5
6
7
8
9
10
11
12
13
14
15
16
17
18
19
20
21
22
23
24
25
26
27
28
29
30
31
32
33
34
35
36
37
38
39
40
41
|
[root@db01 ~]
bind 10.0.0.51
port 26379
daemonize yes
logfile /application/redis_cluster/redis_26379/logs/redis_26379.log
dir /data/redis_cluster/redis_26379
sentinel monitor mymaster 10.0.0.51 6379 2
sentinel down-after-milliseconds mymaster 3000
sentinel parallel-syncs mymaster 1
sentinel failover-timeout mymaster 18000
[root@db01 ~]
[root@db01 ~]
root 933 1 0 5月11 ? 00:00:08 /application/redis_cluster/redis/src/redis-server 10.0.0.51:6379
root 1652 1 0 00:50 ? 00:00:00 redis-sentinel 10.0.0.51:26379 [sentinel]
[root@db01 ~]
bind 10.0.0.51
port 26379
daemonize yes
logfile "/application/redis_cluster/redis_26379/logs/redis_26379.log"
dir "/data/redis_cluster/redis_26379"
sentinel myid 65b3c117682e551b8f647acdaccd33e8d6c0cb75
//自生的id号
sentinel deny-scripts-reconfig yes
sentinel monitor mymaster 10.0.0.51 6379 2
sentinel down-after-milliseconds mymaster 3000
protected-mode no
sentinel failover-timeout mymaster 18000
sentinel config-epoch mymaster 0
sentinel leader-epoch mymaster 0
sentinel known-replica mymaster 10.0.0.53 6379 //从节点
sentinel known-replica mymaster 10.0.0.52 6379 /从节点
sentinel known-sentinel mymaster 10.0.0.53 26379 a569db0ab0f0ba3d0e9b71313feb78e41a45fc03
sentinel known-sentinel mymaster 10.0.0.52 26379 dca7491b21d361aa7f5c6591776a53b3946e1d4b
//从节点redis的id号,用于当主库宕机是对比redisid号选出新的主库
sentinel current-epoch 0
|
注意:哨兵的配置文件不可以手动更改

哨兵的故障转移
1
2
3
4
5
6
7
8
9
10
11
12
13
14
15
16
17
18
19
20
21
| [root@db01 ~]
OK
[root@db01 ~]
"pingcheng.xyz"
[root@db01 ~]
"pingcheng.xyz"
[root@db01 ~]
"pingcheng.xyz"
[root@db01 ~]
[root@db01 ~]
root 1716 1596 0 01:01 pts/1 00:00:00 grep --color=auto redis
[root@db01 ~]
"pingcheng.xyz"
[root@db01 ~]
"pingcheng.xyz"
[root@db01 ~]
1) "slaveof"
2) ""
[root@db01 ~]
1) "slaveof"
2) "10.0.0.53 6379"
|
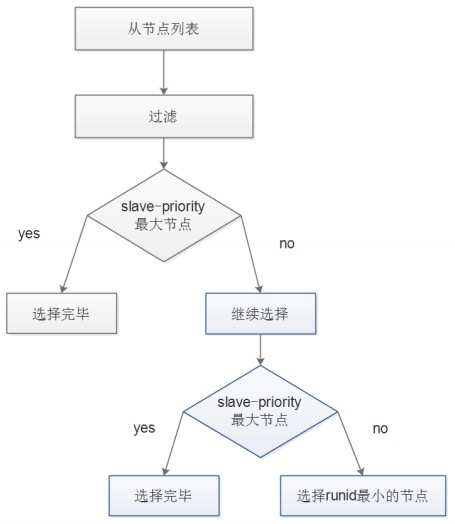
故障转移选举过程:

- 即在权重相同的情况下,通过对比runid选出主节点。
- 权重查询命令:CONFIG GET slave-priority
- 权重设置命令:CONFIG SET slave-priority 0
原主库修复上线,并重新成为主
思路:
- 1.原主库和主库的哨兵修复上线
- 2.降低从节点
slavepriority权重,并在主库上触发重新选举(抢回王位)
- 3.注意 failover 后,将 slave-priority 调回原值.
原主库和主库的哨兵修复上线
1
2
3
4
5
6
7
8
9
10
11
12
13
14
15
| [root@db01 ~]
[root@db01 ~]
[root@db01 ~]
root 1784 1 0 01:22 ? 00:00:00 /application/redis_cluster/redis/src/redis-server 10.0.0.51:6379
root 1789 1 0 01:22 ? 00:00:00 redis-sentinel 10.0.0.51:26379 [sentinel]
root 1794 1596 0 01:22 pts/1 00:00:00 grep --color=auto redis
[root@db01 ~]
1) "slaveof"
2) "10.0.0.53 6379"
[root@db01 ~]
1) "slaveof"
2) "10.0.0.53 6379"
[root@db01 ~]
1) "slaveof"
2) ""
|
想让修复上线的redis成为主库
1
2
3
4
5
6
7
8
9
10
11
12
13
14
15
16
17
18
19
20
21
22
23
24
25
26
27
28
29
30
31
32
33
34
35
36
37
38
| [root@db01 ~]
1) "slave-priority"
2) "100"
[root@db01 ~]
1) "slave-priority"
2) "100"
[root@db01 ~]
1) "slave-priority"
2) "100"
//调大当前库权重
[root@db01 ~]
OK
[root@db01 ~]
OK
[root@db01 ~]
1) "slave-priority"
2) "100"
[root@db01 ~]
1) "slave-priority"
2) "0"
[root@db01 ~]
1) "slave-priority"
2) "0"
//触发重新选举(想让谁成为主库就在谁上面执行此操作)
db01: 哨兵 故障转移 指定组
[root@db01 ~]
OK
[root@db01 ~]
1) "slaveof"
2) ""
[root@db01 ~]
1) "slaveof"
2) "10.0.0.51 6379"
[root@db01 ~]
1) "slaveof"
2) "10.0.0.51 6379"
|
修复其他从库权限,以备下次故障时进行选主
1
2
3
4
5
6
7
8
9
| [root@db01 ~]
1) "slave-priority"
2) "100"
[root@db01 ~]
1) "slave-priority"
2) "100"
[root@db01 ~]
1) "slave-priority"
2) "100"
|
Redis-主从复制&数据恢复&故障处理&哨兵的故障转移
转载前请阅读本站 版权协议,文章著作权归 饼铛 所有,转载请注明出处。 


