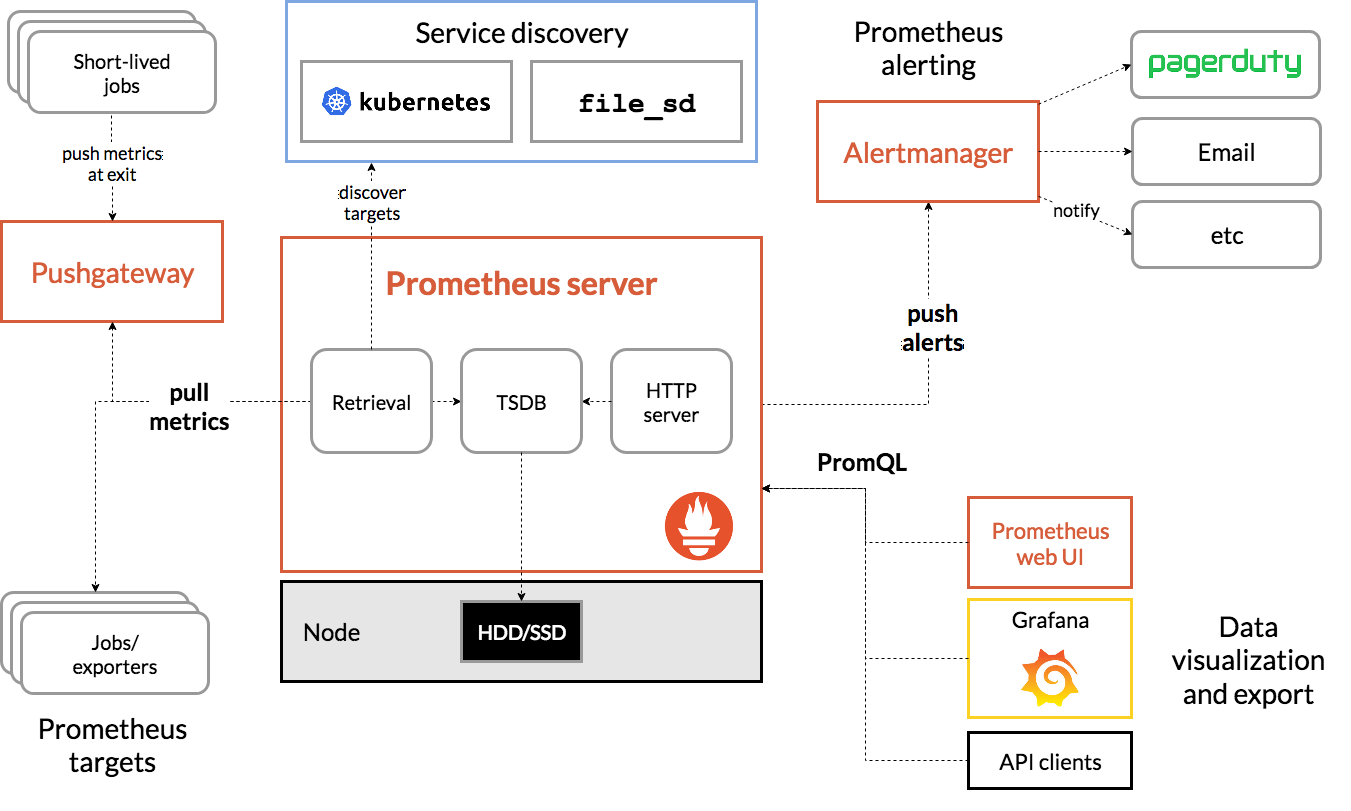
服务监控 对于运维开发人员来说,不管是哪个平台服务,监控都是非常关键重要的。在传统服务里面,我们通常会到zabbix、open-falcon、netdata来做服务的监控,但对于目前主流的K8s平台来说,由于服务pod会被调度到任何机器上运行,且pod挂掉后会被自动重启,并且我们也需要有更好的自动服务发现功能来实现服务报警的自动接入,实现更高效的运维报警,这里需要用到K8s的监控实现Prometheus,它是基于Google内部监控系统的开源实现。
Prometheus介绍
从本质上来讲Prometheus属于是典型的有状态应用,而其有包含了一些自身特有的运维管理和配置管理方式。而这些都无法通过Kubernetes原生提供的应用管理概念实现自动化。为了简化这类应用程序的管理复杂度,CoreOS率先引入了Operator的概念,并且首先推出了针对在Kubernetes下运行和管理Etcd的Etcd Operator。并随后推出了Prometheus Operator。
Prometheus Operator工作原理 从概念上来讲Operator就是针对管理特定应用程序的,在Kubernetes基本的Resource和Controller的概念上,以扩展Kubernetes api的形式。帮助用户创建,配置和管理复杂的有状态应用程序。从而实现特定应用程序的常见操作以及运维自动化。
在Kubernetes中我们使用Deployment、DamenSet,StatefulSet来管理应用Workload,使用Service,Ingress来管理应用的访问方式,使用ConfigMap和Secret来管理应用配置。我们在集群中对这些资源的创建,更新,删除的动作都会被转换为事件(Event),Kubernetes的Controller Manager负责监听这些事件并触发相应的任务来满足用户的期望。这种方式我们成为声明式,用户只需要关心应用程序的最终状态,其它的都通过Kubernetes来帮助我们完成,通过这种方式可以大大简化应用的配置管理复杂度。
而除了这些原生的Resource资源以外,Kubernetes还允许用户添加自己的自定义资源(Custom Resource)。并且通过实现自定义Controller来实现对Kubernetes的扩展。
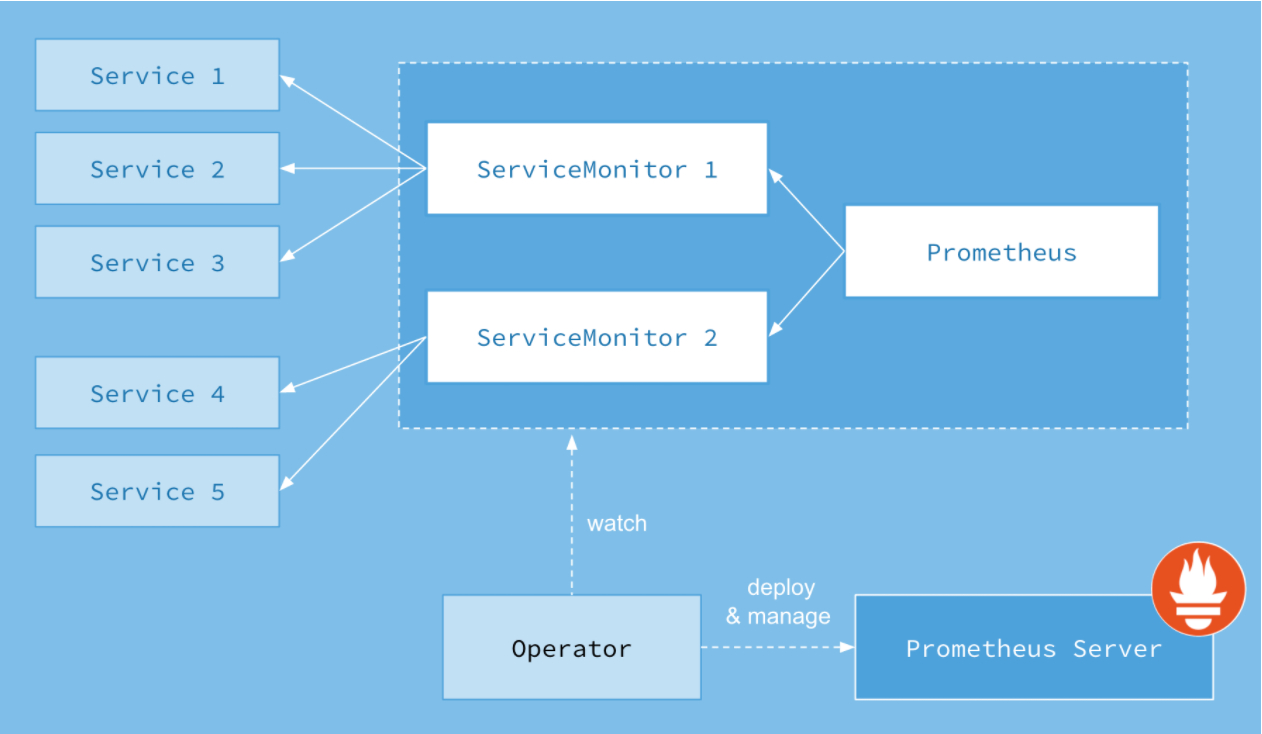
如下所示,是Prometheus Operator的架构示意图:
Prometheus的本质就是一组用户自定义的CRD资源以及Controller的实现,Prometheus Operator负责监听这些自定义资源的变化,并且根据这些资源的定义自动化地完成如Prometheus Server自身以及配置的自动化管理工作。
Prometheus Operator能做什么 要了解Prometheus Operator能做什么,其实就是要了解Prometheus Operator为我们提供了哪些自定义的Kubernetes资源,列出了Prometheus Operator目前提供的️4类资源:
Prometheus:声明式创建和管理Prometheus Server实例;
ServiceMonitor:负责声明式的管理监控配置;
PrometheusRule:负责声明式的管理告警配置;
Alertmanager:声明式的创建和管理Alertmanager实例。
简言之,Prometheus Operator能够帮助用户自动化的创建以及管理Prometheus Server以及其相应的配置。
Prometheus Operator部署 这里用prometheus-operator来安装整套prometheus服务,建议直接用master分支即可,这也是官方所推荐的
https://github.com/prometheus-operator/kube-prometheus
解压下载安装包 1 2 unzip kube-prometheus-master.zip rm -f kube-prometheus-master.zip && cd kube-prometheus-master
提前导入镜像 1 2 3 4 5 6 7 8 9 10 11 12 13 14 15 16 17 18 19 20 21 这里建议先看下有哪些镜像,便于在下载镜像快的节点上先收集好所有需要的离线docker镜像 quay.io/prometheus/prometheus:v2.15.2 quay.io/prometheus/node-exporter:v0.18.1 quay.io/prometheus/alertmanager:v0.20.0 quay.io/fabxc/prometheus_demo_service quay.io/coreos/prometheus-operator:v0.38.1 quay.io/coreos/kube-state-metrics:v1.9.5 quay.io/coreos/kube-rbac-proxy:v0.4.1 quay.io/coreos/k8s-prometheus-adapter-amd64:v0.5.0 grafana/grafana:6.6.0 gcr.io/google_containers/metrics-server-amd64:v0.2.0 [root@k8s-node001 kube-prometheus-release-0.5] /root/prometheus/kube-prometheus-release-0.5 在测试的几个node上把这些离线镜像包都导入 docker load -i xxx.tar ll *.tar|awk '{print $NF}' |sed -r 's#(.*)#docker load -i \1#' | bash
创建所有服务 1 2 3 4 kubectl create -f manifests/setup kubectl create -f manifests/ 过一会查看创建结果: kubectl -n monitoring get all
附:清空上面部署的prometheus所有服务:
访问下prometheus的UI
1 2 3 4 5 6 7 8 service/prometheus-k8s patched NAME TYPE CLUSTER-IP EXTERNAL-IP PORT(S) AGE prometheus-k8s NodePort 10.0.0.11 <none> 9090:32736/TCP 72m
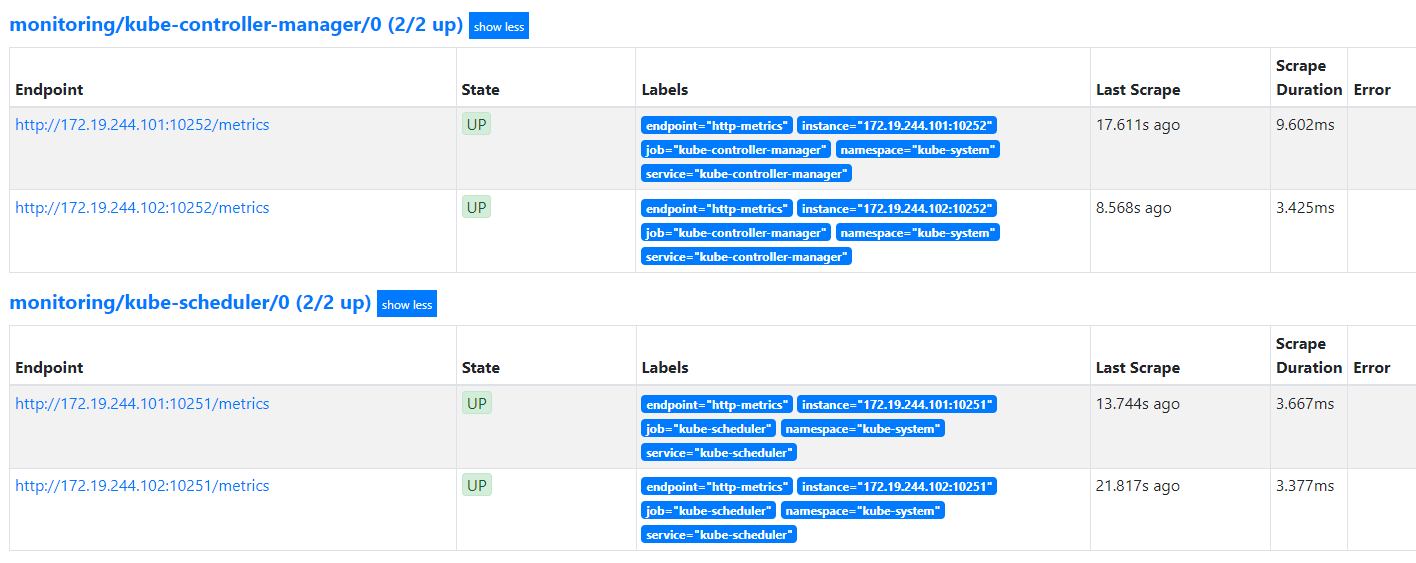
点击上方菜单栏Status — Targets ,发现kube-controller-manager和kube-scheduler未发现
1 2 monitoring/kube-controller-manager/0 (0/0 up) monitoring/kube-scheduler/0 (0/0 up)
注:如果发现下面不是监控的127.0.0.1,并且通过下面地址可以获取metric指标输出,那么这个改IP这一步可以不用操作
1 2 3 4 5 6 7 curl 172.19.244.101:10251/metrics curl 172.19.244.102:10251/metrics LISTEN 0 4096 127.0.0.1:10257 *:* users :(("kube-controller",pid=7224 ,fd=7 )) LISTEN 0 4096 127.0.0.1:10259 *:* users :(("kube-scheduler",pid=7269 ,fd=7 ))
问题定位到了,接下来先把两个组件的监听地址改为0.0.0.0
1 2 3 4 5 6 7 8 9 10 11 12 13 14 15 16 17 18 curl 172.19.244.101:10251/metrics curl 172.19.244.102:10251/metrics
因为K8s的这两上核心组件我们是以二进制形式部署的,为了能让K8s上的prometheus能发现,我们还需要来创建相应的service和endpoints来将其关联起来
注意:我们需要将endpoints里面的NODE IP换成我们实际情况的
1 2 3 4 5 6 7 8 9 10 11 12 13 14 15 16 17 18 19 20 21 22 23 24 25 26 27 28 29 30 31 32 33 34 35 36 37 38 39 40 41 42 43 44 45 46 47 48 49 50 51 52 53 54 55 56 57 58 59 60 61 62 63 64 65 66 67 apiVersion: v1 kind: Service metadata: namespace: kube-system name: kube-controller-manager labels: k8s-app: kube-controller-manager spec: type: ClusterIP clusterIP: None ports: - name: http-metrics port: 10252 targetPort: 10252 protocol: TCP --- apiVersion: v1 kind: Endpoints metadata: labels: k8s-app: kube-controller-manager name: kube-controller-manager namespace: kube-system subsets: - addresses: - ip: 172.19 .244 .101 - ip: 172.19 .244 .102 ports: - name: http-metrics port: 10252 protocol: TCP --- apiVersion: v1 kind: Service metadata: namespace: kube-system name: kube-scheduler labels: k8s-app: kube-scheduler spec: type: ClusterIP clusterIP: None ports: - name: http-metrics port: 10251 targetPort: 10251 protocol: TCP --- apiVersion: v1 kind: Endpoints metadata: labels: k8s-app: kube-scheduler name: kube-scheduler namespace: kube-system subsets: - addresses: - ip: 172.19 .244 .101 - ip: 172.19 .244 .102 ports: - name: http-metrics port: 10251 protocol: TCP
将上面的yaml配置保存为repair-prometheus.yaml,然后创建它kubectl apply -f repair-prometheus.yaml
还需要修改一个地方
1 2 3 4 5 6 7 8 9 port: https-metrics scheme: https port: https-metrics scheme: https
然后再返回prometheus UI处,耐心等待几分钟,就能看到已经被发现了
1 2 monitoring/kube-controller-manager/0 (2/2 up) monitoring/kube-scheduler/0 (2/2 up)
监控ingress-nginx 前面部署过ingress-nginx,这个是整个K8s上所有服务的流量入口组件很关键,因此把它的metrics指标收集到prometheus来做好相关监控至关重要,因为前面ingress-nginx服务是以daemonset形式部署的,并且映射了自己的端口到宿主机上,那么我可以直接用pod运行NODE上的IP来看下metrics
1 2 3 4 5 6 7 curl 172.19.244.103:10254/metrics curl 172.19.244.104:10254/metrics NAME READY STATUS RESTARTS AGE nginx-ingress-controller-7f4c44d946-bhhgr 1/1 Running 0 8d nginx-ingress-controller-7f4c44d946-zvhlx 1/1 Running 2 8d
创建 servicemonitor配置让prometheus能发现ingress-nginx的metrics
1 2 3 4 5 6 7 8 9 10 11 12 13 14 15 16 17 18 19 20 21 22 23 24 25 26 27 28 29 30 31 32 33 34 35 36 37 38 apiVersion: monitoring.coreos.com/v1 kind: ServiceMonitor metadata: labels: app: ingress name: nginx-ingress-scraping namespace: ingress-nginx spec: endpoints: - interval: 30s path: /metrics port: http-metrics jobLabel: app namespaceSelector: matchNames: - ingress-nginx selector: matchLabels: k8s-app: ingress-nginx-metrics --- apiVersion: v1 kind: Service metadata: namespace: ingress-nginx name: ingress-nginx-metrics labels: k8s-app: ingress-nginx-metrics spec: type: ClusterIP clusterIP: None ports: - name: http-metrics port: 10254 targetPort: 10254 protocol: TCP selector: app.kubernetes.io/name: ingress-nginx
创建它
1 2 3 4 5 [root@node001 ingress-ps] servicemonitor.monitoring.coreos.com/nginx-ingress-scraping created [root@node001 ingress-ps] NAME AGE nginx-ingress-scraping 16s
指标没有收集,检查proemtheus错误日志
1 2 level=error ts=2021-06-23T10:39:34.158Z caller =klog.go:94 component=k8s_client_runtime func=ErrorDepth msg="/app/discovery/kubernetes/kubernetes.go:263: Failed to list *v1.Pod: pods is forbidden: User \"system:serviceaccount:monitoring:prometheus-k8s\" cannot list resource \"pods\" in API group \"\" in the namespace \"ingress-nginx\""
需要修改prometheus的clusterrole
1 2 3 4 5 6 7 8 9 10 11 12 13 14 15 16 17 18 19 20 21 22 23 24 25 26 27 28 29 30 31 32 33 34 35 36 37 38 39 40 41 ---原始 rules: - apiGroups: - "" resources: - nodes/metrics verbs: - get - nonResourceURLs: - /metrics verbs: - get --- ---修改后 rules: - apiGroups: - "" resources: - nodes - services - endpoints - pods - nodes/proxy verbs: - get - list - watch - apiGroups: - "" resources: - configmaps - nodes/metrics verbs: - get - nonResourceURLs: - /metrics verbs: - get
结果:
监控ETCD集群 作为K8s所有资源存储的关键服务ETCD,也有必要把它给监控起来,正好借这个机会,完整的演示利用Prometheus来监控非K8s集群服务的步骤
在前面部署K8s集群的时候,是用二进制的方式部署的ETCD集群,并且利用自签证书来配置访问ETCD,现在关键的服务基本都会留有指标metrics接口支持prometheus的监控,利用下面命令,我们可以看到ETCD都暴露出了哪些监控指标出来。
1 2 3 curl --cacert /opt/etcd/ssl/ca.pem --cert /opt/etcd/ssl/server.pem --key /opt/etcd/ssl/server-key.pem https://172.19.244.101:2379/metrics curl --cacert /opt/etcd/ssl/ca.pem --cert /opt/etcd/ssl/server.pem --key /opt/etcd/ssl/server-key.pem https://172.19.244.102:2379/metrics curl --cacert /opt/etcd/ssl/ca.pem --cert /opt/etcd/ssl/server.pem --key /opt/etcd/ssl/server-key.pem https://172.19.244.103:2379/metrics
上面查看没问题后,接下来我们开始进行配置使ETCD能被prometheus发现并监控
1 2 3 4 5 6 7 8 9 10 11 12 13 14 15 kubectl -n monitoring create secret generic etcd-certs --from-file=/opt/etcd/ssl/server.pem --from-file=/opt/etcd/ssl/server-key.pem --from-file=/opt/etcd/ssl/ca.pem kubectl -n monitoring edit prometheus k8s spec: ... secrets: - etcd-certs /prometheus $ ls /etc/prometheus/secrets/etcd-certs/ ca.pem server-key.pem server.pem
接下来准备创建service、endpoints以及ServiceMonitor的yaml配置
注意替换下面的NODE节点IP为实际ETCD所在NODE内网IP
1 2 3 4 5 6 7 8 9 10 11 12 13 14 15 16 17 18 19 20 21 22 23 24 25 26 27 28 29 30 31 32 33 34 35 36 37 38 39 40 41 42 43 44 45 46 47 48 49 50 51 52 53 54 55 56 57 58 apiVersion: v1 kind: Service metadata: name: etcd-k8s namespace: monitoring labels: k8s-app: etcd spec: type: ClusterIP clusterIP: None ports: - name: api port: 2379 protocol: TCP --- apiVersion: v1 kind: Endpoints metadata: name: etcd-k8s namespace: monitoring labels: k8s-app: etcd subsets: - addresses: - ip: 172.19 .244 .101 - ip: 172.19 .244 .102 - ip: 172.19 .244 .103 ports: - name: api port: 2379 protocol: TCP --- apiVersion: monitoring.coreos.com/v1 kind: ServiceMonitor metadata: name: etcd-k8s namespace: monitoring labels: k8s-app: etcd-k8s spec: jobLabel: k8s-app endpoints: - port: api interval: 30s scheme: https tlsConfig: caFile: /etc/prometheus/secrets/etcd-certs/ca.pem certFile: /etc/prometheus/secrets/etcd-certs/server.pem keyFile: /etc/prometheus/secrets/etcd-certs/server-key.pem insecureSkipVerify: true selector: matchLabels: k8s-app: etcd namespaceSelector: matchNames: - monitoring
开始创建上面的资源
1 2 3 4 service/etcd-k8s created endpoints/etcd-k8s created servicemonitor.monitoring.coreos.com/etcd-k8s created
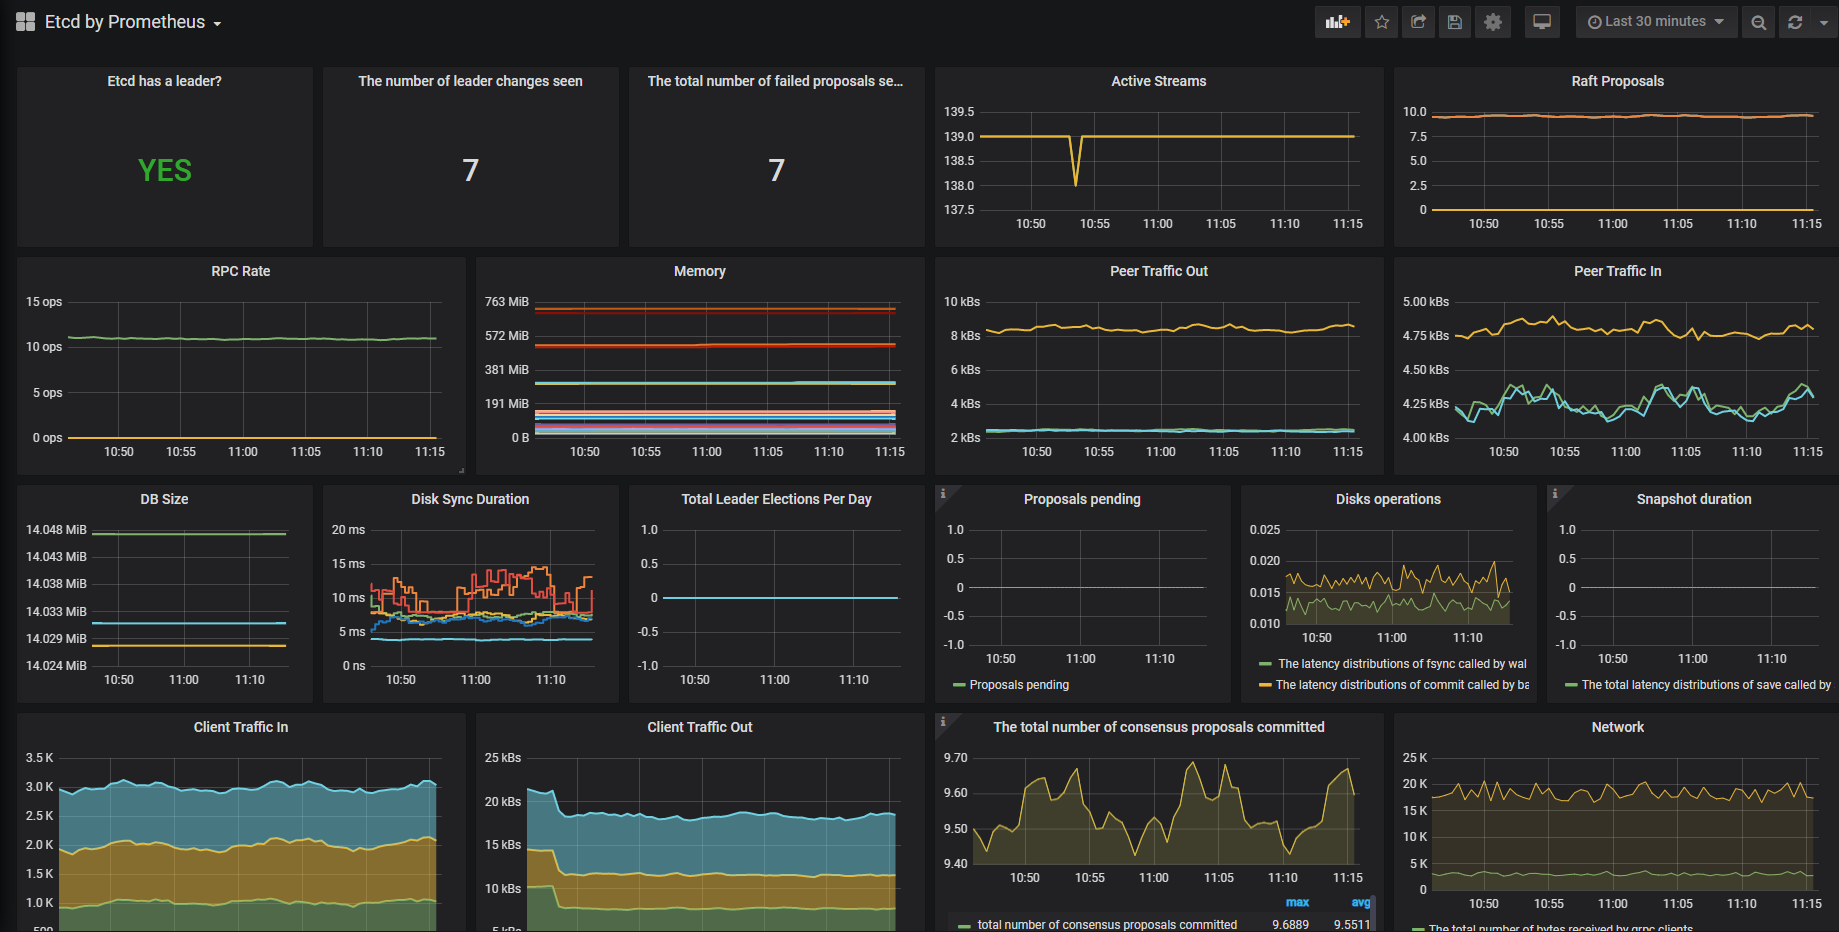
过一会,就可以在prometheus UI上面看到ETCD集群被监控了
接下来我们用grafana来展示被监控的ETCD指标
1 2 3 4 5 6 7 8 9 10 11 12 13 14 15 16 17 18 19 20 apiVersion: v1 kind: Service metadata: labels: app: grafana name: grafana namespace: monitoring spec: ports: - name: http port: 3000 targetPort: http selector: app: grafana type : NodePort grafana NodePort 10.0.0.95 <none> 3000:32216/TCP 2d6h
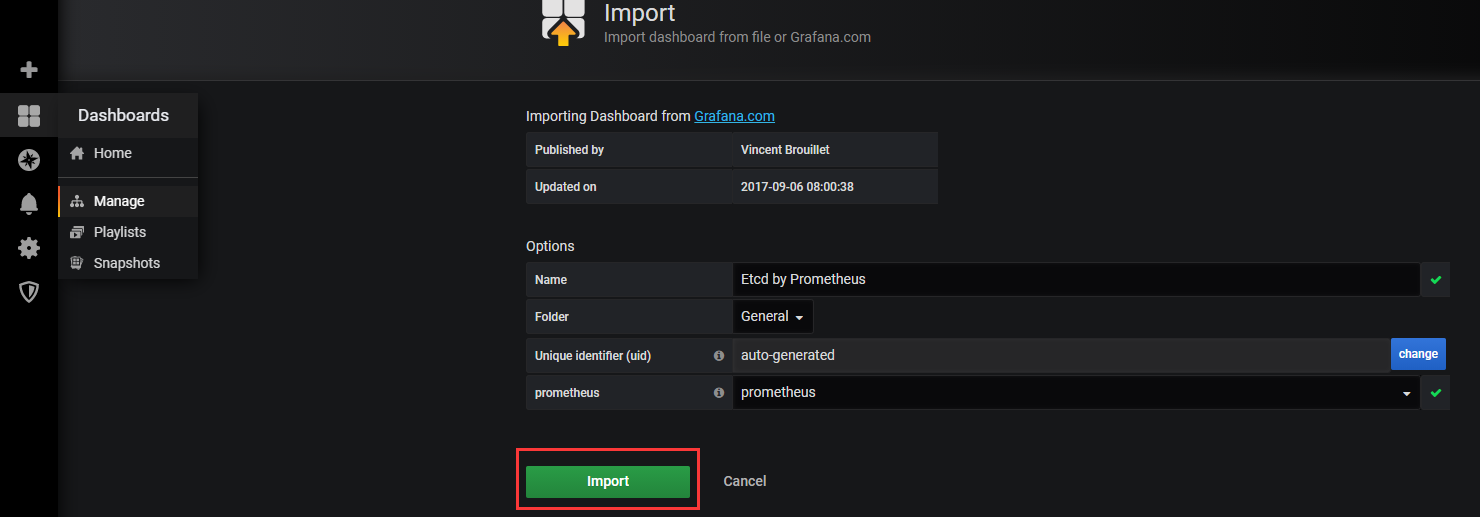
1 2 3 4 5 6 7 8 9 1. 在grafana官网模板中心搜索etcd,下载这个json格式的模板文件 https://grafana.com/dashboards/3070 2.然后打开自己先部署的grafana首页, 点击左边菜单栏四个小正方形方块HOME --- Manage 再点击右边 Import dashboard --- 点击Upload .json File 按钮,上传上面下载好的json文件 etcd_rev3.json, 然后在prometheus选择数据来源 点击Import,即可显示etcd集群的图形监控信息
监控数据的持久化 配置prometheus以及grafana的数据持久化。
Prometheus数据持久化配置 1 2 3 4 5 statefulset.apps/prometheus-k8s 2/2 2d18h pod/prometheus-k8s-0 3/3 Running 1 12h pod/prometheus-k8s-1 3/3 Running 1 12h
为什么需要volumeClaimTemplate?
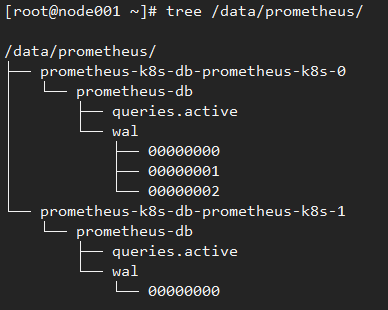
如果集群中没有StorageClass的动态供应PVC的机制,也可以提前手动创建多个PV、PVC,手动创建的PVC名称必须符合之后创建的StatefulSet命名规则:(volumeClaimTemplates.name)-(pod_name)
1 2 3 4 5 6 7 8 9 10 11 12 13 14 15 16 17 18 19 20 21 22 23 24 25 26 27 28 29 30 31 32 33 34 35 36 37 38 39 40 41 42 43 44 45 46 47 48 49 50 51 52 53 54 55 56 57 58 59 60 61 62 63 64 65 66 prometheus-k8s-db-prometheus-k8s-0 prometheus-k8s-db-prometheus-k8s-1 mkdir -p prometheus/{prometheus-k8s-db-prometheus-k8s-0,prometheus-k8s-db-prometheus-k8s-1} && chmod -R 777 /data/prometheus/ apiVersion: v1 kind: PersistentVolume metadata: name: prometheus-k8s-db-prometheus-k8s-{1,0} labels: type: prometheus-k8s-db-prometheus-k8s-{1,0} spec: capacity: storage: 1Pi accessModes: - ReadWriteMany persistentVolumeReclaimPolicy: Retain storageClassName: nfs nfs: path: /prometheus/prometheus-k8s-db-prometheus-k8s-{1,0}/ server: 3xxxxxxxxnghai.nas.aliyuncs.com --- apiVersion: v1 kind: PersistentVolumeClaim metadata: name: prometheus-k8s-db-prometheus-k8s-{1,0} namespace: monitoring spec: accessModes: - ReadWriteMany resources: requests: storage: 1Pi storageClassName: nfs selector: matchLabels: type: prometheus-k8s-db-prometheus-k8s-{1,0} [root@node001 ~ ] NAME STATUS VOLUME CAPACITY ACCESS MODES STORAGECLASS AGE prometheus-k8s-db-prometheus-k8s-0 Bound prometheus-k8s-db-prometheus-k8s-0 1Pi RWX nfs 10m prometheus-k8s-db-prometheus-k8s-1 Bound prometheus-k8s-db-prometheus-k8s-1 1Pi RWX nfs 9m25s spec: ...... storage: volumeClaimTemplate: spec: accessModes: [ "ReadWriteOnce" ] storageClassName: "nfs" resources: requests: storage: 1Pi [root@node001 ~ ] /prometheus $ df -Th Filesystem Type Size Used Available Use% Mounted on ... 39c39494bb-ctc52.cn-shanghai.nas.aliyuncs.com:/prometheus/prometheus-k8s-db-prometheus-k8s-0/prometheus-db nfs4 1. 0P 990. 0M 1024. 0T 0 % /prometheus ...
Grafana数据持久化配置 1 2 3 4 5 6 7 8 9 10 11 12 13 14 15 16 17 18 19 20 21 22 23 24 25 26 27 28 29 30 31 32 33 34 35 mkdir /data/prometheus/grafana && chmod -R 777 /data/prometheus/grafana/ apiVersion: v1 kind: PersistentVolume metadata: name: grafanapv labels: type: grafanapv spec: capacity: storage: 1Pi accessModes: - ReadWriteMany persistentVolumeReclaimPolicy: Retain storageClassName: nfs nfs: path: /prometheus/grafana/ server: 3xxxxxxxxnghai.nas.aliyuncs.com --- apiVersion: v1 kind: PersistentVolumeClaim metadata: name: grafana namespace: monitoring spec: accessModes: - ReadWriteMany resources: requests: storage: 1Pi storageClassName: nfs selector: matchLabels: type: grafanapv
查看
1 2 3 4 5 6 7 8 9 10 11 12 13 14 15 16 17 18 19 20 21 22 23 24 25 26 27 NAME STATUS VOLUME CAPACITY ACCESS MODES STORAGECLASS AGE grafana Bound grafanapv 1Pi RWX nfs 7m51s 528 volumes: 529 - emptyDir: {} 530 name: grafana-storage 528 volumes: 529 - name: grafana-storage 530 persistentVolumeClaim: 531 claimName: grafana spec: containers: ...... 462 env : 463 - name: GF_SECURITY_ADMIN_USER 464 value: admin 465 - name: GF_SECURITY_ADMIN_PASSWORD 466 value: Wikifx2021
查看
1 2 3 4 5 6 7 8 [root@node001 prometheus] total 1401 -rw-r--r-- 1 nfsnobody nfsnobody 1433600 Jun 24 15:46 grafana.db drwxr-xr-x 2 nfsnobody nfsnobody 4096 Jun 24 15:45 plugins drwx------ 2 nfsnobody nfsnobody 4096 Jun 24 15:45 png [root@node001 prometheus] NAME READY STATUS RESTARTS AGE grafana-6c6cddc7b7-lqxq2 1/1 Running 0 56s
prometheus发送报警 早期经常用邮箱接收报警邮件,但是报警不及时,而且目前各云平台对邮件发送限制还比较严格,所以目前在生产中用得更为多的是基于webhook来转发报警内容到企业中用的聊天工具中,比如钉钉、企业微信、飞书等。
prometheus的报警组件是Alertmanager,它支持自定义webhook的方式来接受它发出的报警,它发出的日志json字段比较多,我们需要根据需要接收的app来做相应的日志清洗转发。
首先看下报警规则及报警发送配置是什么样的
prometheus-operator的规则非常齐全,基本属于开箱即用类型,可以根据日常收到的报警,对里面的rules报警规则作针对性的调整,比如把报警观察时长缩短一点等。
1 2 监控报警规划修改 vim ./manifests/prometheus-rules.yaml 修改完成记得更新 kubectl apply -f ./manifests/prometheus-rules.yaml
1 2 3 4 5 6 7 8 9 10 11 12 13 14 15 16 17 18 ... - name: config-volume secret: defaultMode: 420 secretName: alertmanager-main ... NAME TYPE DATA AGE alertmanager-main Opaque 1 3d1h kubectl create secret generic alertmanager-main --from-file=alertmanager.yaml -n monitoring
报警配置文件 alertmanager.yaml
1 2 3 4 5 6 7 8 9 10 11 12 13 14 15 16 17 18 19 20 21 22 23 24 25 26 27 28 29 30 31 32 33 34 35 36 37 38 39 40 41 42 43 44 45 46 47 48 49 50 51 52 53 54 55 56 57 58 59 60 61 62 global: resolve_timeout: 10m templates: - '/etc/altermanager/config/*.tmpl' route: group_by: ['job' , 'altername' , 'cluster' , 'service' ,'severity' ] group_wait: 10s group_interval: 20s repeat_interval: 1m receiver: 'webhook' routes: - match_re: service: ^(foo1|foo2|baz)$ receiver: 'webhook' routes: - match: severity: critical receiver: 'webhook' - match: service: database receiver: 'webhook' - match: severity: critical receiver: 'webhook' inhibit_rules: - source_match: severity: 'critical' target_match: severity: 'warning' receivers: - name: 'webhook' webhook_configs: - url: 'http://alertmanaer-dingtalk-svc.kube-system/1bdc0637/prometheus/feishu' send_resolved: true
附:监控其他服务的prometheus规则配置https://github.com/samber/awesome-prometheus-alerts
构建转发程序:
1 2 3 4 5 6 7 8 9 10 11 12 13 14 15 16 17 18 19 FROM alpine:3.13 MAINTAINER cakepanit.comENV TZ "Asia/Shanghai" RUN sed -ri 's+dl-cdn.alpinelinux.org+mirrors.aliyun.com+g' /etc/apk/repositories \ && apk add --no-cache curl tzdata ca-certificates \ && cp -f /usr/share/zoneinfo/Asia/Shanghai /etc/localtime \ && apk upgrade \ && rm -rf /var/cache/apk/* COPY mycli /usr/local/bin/ RUN chmod +x /usr/local/bin/mycli ENTRYPOINT ["mycli" ] CMD ["-h" ]
1 2 3 4 5 6 7 8 9 10 11 12 13 14 15 16 17 18 19 20 21 22 23 24 25 26 27 28 29 30 31 32 33 34 35 36 37 38 39 40 41 42 43 44 45 46 47 48 49 50 51 52 53 54 55 56 57 58 59 60 61 62 apiVersion: v1 kind: Service metadata: name: alertmanaer-dingtalk-svc namespace: kube-system labels: app: alertmanaer-webhook model: dingtalk spec: ports: - port: 80 protocol: TCP targetPort: 9999 type : ClusterIP selector: app: alertmanaer-webhook model: dingtalk --- apiVersion: apps/v1 kind: Deployment metadata: labels: app: alertmanaer-webhook model: dingtalk name: alertmanaer-dingtalk-dp namespace: kube-system spec: replicas: 1 selector: matchLabels: app: alertmanaer-webhook model: dingtalk template: metadata: labels: app: alertmanaer-webhook model: dingtalk spec: containers: - name: alertmanaer-webhook image: registry.cn-shanghai.aliyuncs.com/wikifx/base:alertmanaer-webhookv1.0 env : - name: TZ value: Asia/Shanghai ports: - containerPort: 9999 args: - web - "https://open.feishu.cn/open-apis/bot/v2/hook/beb78afe-0658-47ef-a2d9-29b396425b88" - "9999" - "serviceA,DeadMansSnitch" [GIN-debug] GET /status --> mycli/libs.MyWebServer.func1 (3 handlers) [GIN-debug] POST /b01bdc063/boge/getjson --> mycli/libs.MyWebServer.func2 (3 handlers) [GIN-debug] POST /7332f19/prometheus/dingtalk --> mycli/libs.MyWebServer.func3 (3 handlers) [GIN-debug] POST /1bdc0637/prometheus/feishu --> mycli/libs.MyWebServer.func4 (3 handlers) [GIN-debug] POST /5e00fc1a/prometheus/weixin --> mycli/libs.MyWebServer.func5 (3 handlers)
测试:
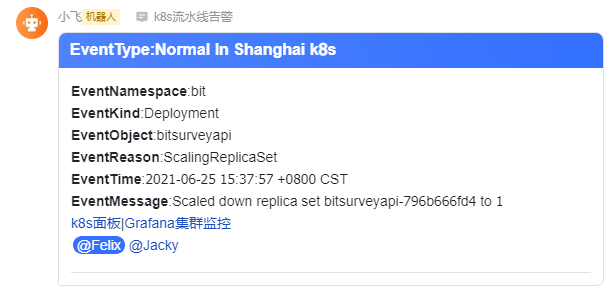
事件监控告警 在Kubernetes中,事件分为两种,一种是Warning事件,表示产生这个事件的状态转换是在非预期的状态之间产生的;另外一种是Normal事件,表示期望到达的状态,和目前达到的状态是一致的。我们用一个Pod的生命周期进行举例,当创建一个Pod的时候,首先Pod会进入Pending的状态,等待镜像的拉取,当镜像录取完毕并通过健康检查的时候,Pod的状态就变为Running。此时会生成Normal的事件。而如果在运行中,由于OOM或者其他原因造成Pod宕掉,进入Failed的状态,而这种状态是非预期的,那么此时会在Kubernetes中产生Warning的事件。那么针对这种场景而言,如果我们能够通过监控事件的产生就可以非常及时的查看到一些容易被资源监控忽略的问题。
一个标准的Kubernetes事件有如下几个重要的属性,通过这些属性可以更好地诊断和告警问题。
Namespace:产生事件的对象所在的命名空间。
1 2 3 4 5 6 7 [root@node001 ~] NAMESPACE LAST SEEN TYPE REASON OBJECT MESSAGE baseservice 7m26s Normal Killing pod/ipinversion-d64864cf7-m2cvg Stopping container ipinversion baseservice 7m20s Warning Unhealthy pod/ipinversion-d64864cf7-m2cvg Readiness probe failed: Get http://10.244.4.93:8031/swagger/index.html: net/http: request canceled while waiting for connection (Client.Timeout exceeded while awaiting headers) baseservice 7m26s Normal SuccessfulDelete replicaset/ipinversion-d64864cf7 Deleted pod: ipinversion-d64864cf7-m2cvg baseservice 7m26s Normal ScalingReplicaSet deployment/ipinversion Scaled down replica set ipinversion-d64864cf7 to 2 ...
ali kube-eventer 针对Kubernetes的事件监控场景,Kuernetes社区在Heapter中提供了简单的事件离线能力,后来随着Heapster的废弃,相关的能力也一起被归档了。为了弥补事件监控场景的缺失,阿里云容器服务发布并开源了kubernetes事件离线工具kube-eventer。支持离线kubernetes事件到钉钉机器人、飞书机器人、SLS日志服务、Kafka开源消息队列、InfluxDB时序数据库等等。
GitHub地址:https://github.com/AliyunContainerService/kube-eventer
Webhook 配置说明:https://github.com/AliyunContainerService/kube-eventer/blob/master/docs/en/webhook-sink.md
下面是以飞书机器人告警发送为例:
1 2 3 4 5 6 7 8 9 10 11 12 13 14 15 16 17 18 19 20 21 22 23 24 25 26 27 28 29 30 31 32 33 34 35 36 37 38 39 40 41 42 43 44 45 46 47 48 49 50 51 52 53 54 55 56 57 58 59 60 61 62 63 64 65 66 67 68 69 70 71 72 73 74 75 76 77 78 79 80 81 82 83 84 85 86 87 88 89 90 91 92 93 94 95 96 97 98 99 100 101 102 apiVersion: apps/v1 kind: Deployment metadata: labels: name: kube-eventer name: kube-eventer namespace: kube-system spec: replicas: 1 selector: matchLabels: app: kube-eventer template: metadata: labels: app: kube-eventer annotations: scheduler.alpha.kubernetes.io/critical-pod: '' spec: dnsPolicy: ClusterFirstWithHostNet serviceAccount: kube-eventer containers: - image: registry.aliyuncs.com/acs/kube-eventer-amd64:v1.2.0-484d9cd-aliyun name: kube-eventer command: - "/kube-eventer" - "--source=kubernetes:https://kubernetes.default" - --sink=webhook:https://open.feishu.cn/open-apis/bot/v2/hook/beb78afe-0658-47ef-a2d9-2xxxxxxx8?level=Normal&header=Convtent-Type=application/json&custom_body_configmap=custom-webhook-body&custom_body_configmap_namespace=kube-system&method=POST - --sink=webhook:https://open.feishu.cn/open-apis/bot/v2/hook/beb78afe-0658-47ef-a2d9-2xxxxxxx8?level=Warning&header=Convtent-Type=application/json&custom_body_configmap=custom-webhook-body&custom_body_configmap_namespace=kube-system&method=POST env: - name: TZ value: "Asia/Shanghai" volumeMounts: - name: localtime mountPath: /etc/localtime readOnly: true - name: zoneinfo mountPath: /usr/share/zoneinfo readOnly: true resources: requests: cpu: 100m memory: 100Mi limits: cpu: 500m memory: 250Mi volumes: - name: localtime hostPath: path: /etc/localtime - name: zoneinfo hostPath: path: /usr/share/zoneinfo --- apiVersion: rbac.authorization.k8s.io/v1 kind: ClusterRole metadata: name: kube-eventer rules: - apiGroups: - "" resources: - events - configmaps verbs: - get - list - watch --- apiVersion: rbac.authorization.k8s.io/v1 kind: ClusterRoleBinding metadata: name: kube-eventer roleRef: apiGroup: rbac.authorization.k8s.io kind: ClusterRole name: kube-eventer subjects: - kind: ServiceAccount name: kube-eventer namespace: kube-system --- apiVersion: v1 kind: ServiceAccount metadata: name: kube-eventer namespace: kube-system --- apiVersion: v1 data: content: >- {"msg_type":"interactive","card":{"config":{"wide_screen_mode":true},"header":{"title":{"tag":"plain_text","content":"EventType:{{ .Type }} In Shanghai k8s"},"template":"blue"},"elements":[{"tag":"markdown","content":"**EventNamespace**:{{ .InvolvedObject.Namespace }} \n**EventKind**:{{ .InvolvedObject.Kind }} \n**EventObject**:{{ .InvolvedObject.Name }} \n**EventReason**:{{ .Reason }} \n**EventTime**:{{ .LastTimestamp }} \n**EventMessage**:{{ .Message }} \n[k8s面板](https://ops.xxxx.com:4433/)|[Grafana集群监控](https://ops.xxxx.com:4434/login) \n<at id=6833974120049278977></at><at id=6795355516563357697></at>\n ---"}]}} kind: ConfigMap metadata: name: custom-webhook-body namespace: kube-system
测试:

