
分区方案
普通分区形式
- /boot 引导分区 512M-1024M
- swap 交换分区 内存大于8G,给8G。内存小于8G,给到1.5倍的内存。
- / 给所有空间
使用条件
- 1、数据不那么重要。
- 2、必须必须要有备份策略:就是实时的。
- 内部人员发布数据,同时发布到两台以上生产服务器里。是三个备份,GIT上,代码。
- 外部用户写入数据(图片、视频 文字),
- 同时发布到两台服务器后面共享的服务器上(对这个共享服务器做备份),
- 两个备份。
存储服务器(含数据库)的分区方式
- /boot 引导分区 512M-1024M
- swap 交换分区 内存大于8G,给8G。内存小于8G,给到1.5倍的内存。
- / 给100G
- /data 剩余给数据分区 ,data可以是任意名称。
门户网站的分区方案
- /boot 引导分区 512M-1024M
- swap 交换分区 内存大于8G,给8G。内存小于8G,给到1.5倍的内存。
- / 给100G
- 剩余保留,将来哪个部门使用,使用部门自己分剩余的分区。
错误分区方案
- /boot 引导分区 512M-1024M
- swap 交换分区 内存大于8G,给8G。内存小于8G,给到1.5倍的内存。
- /home 家目录
- /var
- /usr
- /
LVM动态调整。降低性能。
传统企业,没有多少用户,一天同时几十个并发访问,数据量还不大。
更改网卡名字为传统eth*
安装时按Tab键在grub(100行左右)结尾添加net.ifnames=0 biosdevname=0
语言环境
vim /etc/locale.conf
英语:en_US.UTF-8
中文:zh_CN.UTF-8
配置网络
nmtui(c6 setup)
ip route #查看网关
更改国内YUM源
curl -s -o /etc/yum.repos.d/CentOS-Base.repo http://mirrors.aliyun.com/repo/Centos-7.repo
curl -s -o /etc/yum.repos.d/epel.repo http://mirrors.aliyun.com/repo/epel-7.repo #epel源中弥补官方源没有的软件包
企业运维常用基础工具包
CentOS6和CentOS7都要安装的企业运维常用基础工具包
yum install tree nmap dos2unix lrzsz nc lsof wget tcpdump htop iftop iotop sysstat nethogs -y
tree		#tree以树形结构显示文件和目录
nmap	#端口扫描工具
dos2unix	#转换脚本格式工具
lrzsz		#包含上传(rz)下载(sz)文件工具
nc		#文件传输、端口检查工具
lsof		#反查端口进程,已经服务开发文件工具
wget	#下载工具
tcpdump	#抓包、监听等重要排错工具
htop	#系统进程相关信息查看工具
iftop	#查看主机网卡带宽工具
sysstat	#含有sar,iostat等重要性能查看工具
nethogs	#显示进程的网络流量
CentOS7要安装的企业运维常用基础工具包
yum install psmisc net-tools bash-completion vim-enhanced -y
psmisc	#含有killall、pstree等命令
net-tools	#含有netstat、ifconfig、route、arp等命令
bash-completion
bash-completion-extras	##tab 补全功能工具包
vim-enhanced	#vim编辑器工具包
CentOS7升级内核
1)更新yum源仓库:
rpm --import https://www.elrepo.org/RPM-GPG-KEY-elrepo.org
rpm -Uvh http://www.elrepo.org/elrepo-release-7.0-3.el7.elrepo.noarch.rpm
2)查看可用的内核包: yum --disablerepo="*" --enablerepo="elrepo-kernel" list available
3)安装最新版本内核
yum --enablerepo=elrepo-kernel install kernel-ml
4)查看系统上的所有可用内核
awk -F \' '$1=="menuentry "{print i++ " : " $2}' /etc/grub2.cfg
5)设置新的内核为grub2的默认版本:
grub2-set-default 0
6)生成 grub 配置文件并重启:
grub2-mkconfig -o /boot/grub2/grub.cfg
7)重新启动服务器:reboot
8)查看内核版本:
[root@test ~]# uname -r
5.7.6-1.el7.elrepo.x86_64
gcc升级
1)需要将gcc升级到8.1.0
[root@pincheng ~]# cd /usr/local/src/
[root@pincheng src]# wget http://ftp.gnu.org/gnu/gcc/gcc-8.1.0/gcc-8.1.0.tar.gz
[root@pincheng src]# tar xf gcc-8.1.0.tar.gz
[root@pincheng src]# cd gcc-8.1.0/
2)运行自带脚本,完成下载、配置、安装依赖库,可以节约我们大量的时间和精力
[root@pincheng gcc-8.1.0]# ./contrib/download_prerequisites3)建立一个目录供编译出的文件存放
[root@pincheng gcc-8.1.0]# mkdir gcc-build-8.1.0
[root@pincheng gcc-8.1.0]# cd gcc-build-8.1.0
4)生成makefile文件
[root@pincheng gcc-build-8.1.0]# ../configure -enable-checking=release -enable-languages=c,c++ -disable-multilib5)编译(很耗时,-j4对多核处理器的优化)
[root@pincheng gcc-build-8.1.0]# make -j4 && make install6)验证是否成功,如果还是显示原来的版本,则需要重启系统
[root@pincheng ~]# gcc -v补充安装包组
mini安装时,应当选择四个包组分别是
yum group install "Compatibility" "Base" "Development tools"
yum group install "debuging Tools" "Dial-up Networking Support"

[root@www ~]# yum groups mark convert
[root@www ~]# yum grouplist        #<==查看所有包组名称,包括已安装的和未安装的
Available Environment Groups:#可用的包组
   Minimal Install
   Compute Node
   Infrastructure Server
   File and Print Server
   Cinnamon Desktop
   MATE Desktop
   Basic Web Server
   Virtualization Host
   Server with GUI
   GNOME Desktop
   KDE Plasma Workspaces
   Development and Creative Workstation
Installed Groups:#已安装的包组
   Development Tools
   Legacy UNIX Compatibility
   Milkymist
   Security Tools
   System Administration Tools
查看如果系统未安装或是忘记安装这些组包,须完善。
集群优化
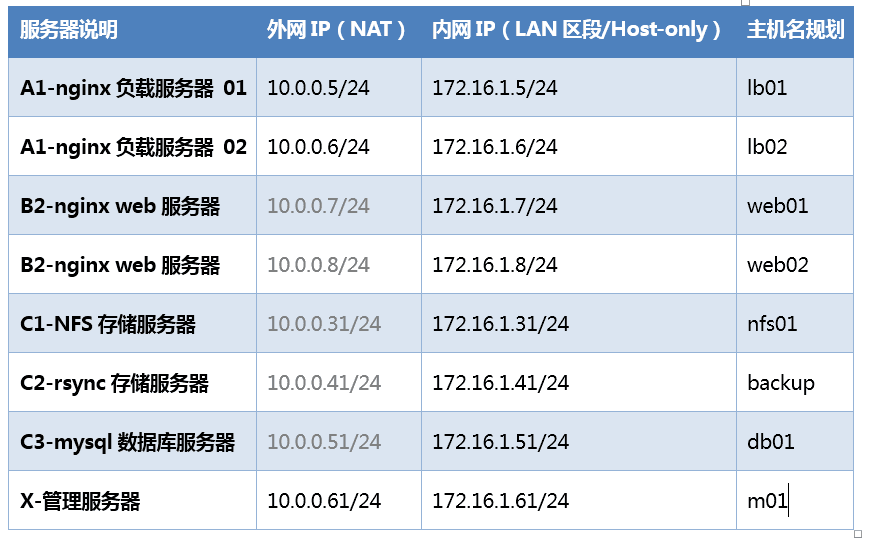
地址规划
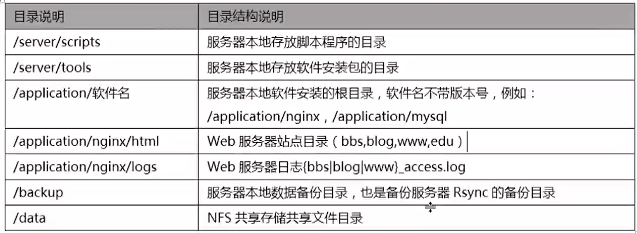
目录规划
统一环境:
- 系统的基础优化
- 修改主机名ip地址
- 主机名能解析
系统基础优化:
修改提示符颜色
[root@s01 ~]$ echo "PS1='[\[\e[34;1m\]\u@\[\e[0m\]\[\e[32;1m\]\H\[\e[0m\]\[\e[31;1m\] \w\[\e[0m\]]\$ '" >> /etc/bashrc
. /etc/bashrc
规范目录
mkdir -p /server/tools
mkdir -p /server/scripts
配置所有主机域名hosts解析
cat >/etc/hosts<<EOF
127.0.0.1 localhost localhost.localdomain localhost4 localhost4.localdomain4
::1 localhost localhost.localdomain localhost6 localhost6.localdomain6
172.16.1.5 lb01
172.16.1.6 lb02
172.16.1.7 web01
172.16.1.8 web02
172.16.1.9 web03
172.16.1.31 nfs01
172.16.1.41 backup
172.16.1.51 db01 db01.etiantian.org
172.16.1.61 m01
EOF
更改主机名
hostnamectl set-hostname 主机名更新yum源
curl -s -o /etc/yum.repos.d/CentOS-Base.repo http://mirrors.aliyun.com/repo/Centos-7.repo
curl -s -o /etc/yum.repos.d/epel.repo http://mirrors.aliyun.com/repo/epel-7.repo #epel源
关闭SELinux
sed -i 's#SELINUX=.*#SELINUX=disabled#g' /etc/selinux/config
grep SELINUX=disabled /etc/selinux/config
setenforce 0
getenforce
关闭firewalld防火墙
PS:有外网的服务器要开,纯内网服务器可以关闭。
systemctl stop firewalld
systemctl disable firewalld
systemctl status firewalld
添加普通用户并提权
useradd felix
echo 591740|passwd --stdin felix
\cp /etc/sudoers /etc/sudoers.ori
echo "felix  ALL=(ALL) NOPASSWD: ALL " >>/etc/sudoers
tail -1 /etc/sudoers
visudo -c
更改字符集
cp /etc/locale.conf{,.ori}
echo 'LANG="zh_CN.UTF-8"' >/etc/locale.conf   或者  localectl set-locale LANG="zh_CN.UTF-8"
. /etc/locale.conf
echo $LANG
zh_CN.UTF-8
cat /etc/locale.conf.ori
LANG="en_US.UTF-8"
时间同步
yum install ntpdate -y
/usr/sbin/ntpdate ntp3.aliyun.com

echo '#crond-id-001:time sync by oldboy' >>/var/spool/cron/root
echo "*/5 * * * * /usr/sbin/ntpdate ntp3.aliyun.com >/dev/null 2>&1">>/var/spool/cron/root
crontab -l
提升命令行操作安全性(可选优化)
# 提升命令行安全(可选配置)
echo 'export TMOUT=300' >>/etc/profile  #<==会话超时时间300s
echo 'export HISTSIZE=5' >>/etc/profile  #<==只保留5个历史命令
echo 'export HISTFILESIZE=5' >>/etc/profile   #<==~/.bash_history 只保留五个
tail -3 /etc/profile
. /etc/profile
文件描述符
一般情况下,一台服务器被访问时,会启用很多的程序,而启动每一个程序的进程都会占用文件服务器描述符的大小,因此有时需要加大文件描述符的大小,从而不影响到程序的启动。

echo '*               -       nofile          65535 ' >>/etc/security/limits.conf
tail -1 /etc/security/limits.conf
ulimit -SHn   65535   #<==临时修改文件描述符大小
ulimit -n        #<==命令方式查看配置结果
内核优化
cat >>/etc/sysctl.conf<<EOF
net.ipv4.tcp_fin_timeout = 2
net.ipv4.tcp_tw_reuse = 1
net.ipv4.tcp_tw_recycle = 1
net.ipv4.tcp_syncookies = 1
net.ipv4.tcp_keepalive_time = 600
net.ipv4.ip_local_port_range = 4000    65000
net.ipv4.tcp_max_syn_backlog = 16384
net.ipv4.tcp_max_tw_buckets = 36000
net.ipv4.route.gc_timeout = 100
net.ipv4.tcp_syn_retries = 1
net.ipv4.tcp_synack_retries = 1
net.core.somaxconn = 16384
net.core.netdev_max_backlog = 16384
net.ipv4.tcp_max_orphans = 16384
#以下参数是对iptables防火墙的优化,防火墙不开会提示,可以忽略不理。
net.nf_conntrack_max = 25000000
net.netfilter.nf_conntrack_max = 25000000
net.netfilter.nf_conntrack_tcp_timeout_established = 180
net.netfilter.nf_conntrack_tcp_timeout_time_wait = 120
net.netfilter.nf_conntrack_tcp_timeout_close_wait = 60
net.netfilter.nf_conntrack_tcp_timeout_fin_wait = 120
net.core.wmem_default = 8388608
net.core.rmem_default = 8388608
net.core.wmem_max = 16777216
net.core.rmem_max = 16777216
EOF
sysctl -p
基础优化操作项:优化SSH远程连接效率
- 禁止root远程连接
- 修改默认22端口,改为52113
- 监听内网服务器IP
\cp /etc/ssh/sshd_config{..ori}#备份sed -i -e "17s/.*/Port 52113/g"/etc/ssh/sshd_config#说明:修改ssh服务监听的默认22端口,使用自定义指定的监听端口进行连接sed -i -e "19s/.*/ListenAddress 172.16.1.41/g"/etc/ssh/sshd_config#说明:修改ssh服务监听的默认ip地址,默认为0.0.0.0全部监听,可以自定义指定监听内网ip地址sed -i -e "38s/.*/PermitRootLogin no/g"/etc/ssh/sshd_config#关闭ssh登录root用户权限,提升系统安全性sed -i -e "64s/.*/PermitEmptyPasswords no/g"/etc/ssh/sshd_config#说明:禁止空密码用户ssh连接登录系统
#如果是CentOS6还要修改ssh配置,防止连接速度慢优化
既把UseDNS yes改为UseDNS no,把GSSAPIAuthentication yes 改为GSSAPIAuthentication no经过检查发现CentOS7.6已经默认都改好了。
提别说明:以上均采用sed替换方式修改ssh服务配置文件,替换时指定的行号会根据不同版本的系统有变化,最好以工作中常用的系统为主,修改相应行号。
扩展优化操作项-修改yum.conf文件配置信息
保留yum安装的软件包
将`/etc/yum.conf`中的`keepcache=0`改为`keepcache=1`,为日后一键安装网站集群留好rpm及依赖工具包。
[root@backup ~]# vim /etc/yum.conf

[main]
cachedir=/var/cache/yum/$basearch/$releasever
keepcache=1     #<===
debuglevel=2
logfile=/var/log/yum.log
exactarch=1
obsoletes=1
gpgcheck=1
plugins=1
installonly_limit=5
bugtracker_url=http://bugs.centos.org/set_project.php?project_id=23&ref=http://bugs.centos.org/bug_report_page.php?category=yum
distroverpkg=centos-release


#  This is the default, if you make this bigger yum won't see if the metadata
# is newer on the remote and so you'll "gain" the bandwidth of not having to
# download the new metadata and "pay" for it by yum not having correct
# information.
#  It is esp. important, to have correct metadata, for distributions like
# Fedora which don't keep old packages around. If you don't like this checking
# interupting your command line usage, it's much better to have something
# manually check the metadata once an hour (yum-updatesd will do this).
# metadata_expire=90m

# PUT YOUR REPOS HERE OR IN separate files named file.repo
# in /etc/yum.repos.d
软件包保存目录:`/var/cache/yum/`
精简并保留必要的开机自启动服务
(如crond、sshd、network、rsyslog、sysstat、NetworkManager、irqbalance)。systemctl list-unit-files | grep enabled <==查看开机自启服务
systemctl list-unit-files |grep enable|egrep -v "sshd.service|crond.service|sysstat|rsyslog|^NetworkManager.service|irqbalance.service"|awk '{print "systemctl disable",$1}'|bash简单解析(以管道为一组):
- 管道1:列出所有服务
- 管道2:过滤出开机自启动的服务
- 管道3:egrep -v 取反,将<br>`sshd.service|crond.service|sysstat|rsyslog|^NetworkManager.service|irqbalance.service` 保留项排除
- 管道4:利用awk 不指定分隔符 默认空格,打印出systemctl disable 接$1 即 服务名
- 管道5:将组合出的数据流(命令)交给bash执行
结果:
[root@s01 ~]# netstat -lntup
Active Internet connections (only servers)
Proto Recv-Q Send-Q Local Address           Foreign Address         State       PID/Program name
tcp        0      0 0.0.0.0:22              0.0.0.0:*               LISTEN      705/sshd
tcp6       0      0 :::22                   :::*                    LISTEN      705/sshd
锁定关键系统文件
如`/etc/passwd、/etc/shadow、/etc/group、/etc/gshadow、/etc/inittab`,处理以上内容后把chattr、lsattr改名为felix,转移走,这样就安全多了。
调整用户登录提示信息
/etc/motd、清空/etc/issue、/etc/issue.net,去除系统及内核版本登录前的屏幕显示。
清除多余的系统虚拟用户账号
禁止主机被ping(内核参数)
echo "net.ipv4.icmp_echo_ignore_all=1" >> /etc/sysctl.conf
sysctl -p