
Ubuntu系列
Ubuntu 16.x
1)编辑或创建 /etc/dhcp/dhclient.conf文件。
注意:您必须拥有根用户权限才能编辑此文件。您可以使用sudo -i成为根用户,或者使用 sudo 执行所有命令。
2)将 supersede 命令添加到文件以覆盖 domain-name-servers。:
# /etc/dhcp/dhclient.conf 文件尾部追加
supersede domain-name-servers 172.22.xxx.xxx,10.xx.xx.202,10.xx.xx.244;
supersede domain-name "xxx.bilibili.xxx";
在此修改之后,resolv.conf 文件将在实例重启时或重启网络时更新,以仅包含您在 dhclient 文件中指定的 DNS 服务器。有关 supersede 命令的更多信息,请参阅 Linux 手册页上的 dhclient.conf(5)。
3)重启实例或网络。
systemctl restart networkingUbuntu 18.x ~ 22
默认情况下,在 Ubuntu 18.x 上,由 netplan.io 软件包处理网络接口配置,且由启用系统解析的服务使用存根解析程序处理 DNS 查询。存根解析程序 IP 位于 /etc/resolv.conf。
在这些发行版中DNS被systemd-resolved模块接管。原来配置DNS的文件 /etc/resolv.conf 已经变成了指向systemd-resolve服务在本地侦听的端口 127.0.0.53:53。这个文件本身标注了不要修改,因为它已经变成了软连接,指向了systemd-resolve控制的配置文件。且修改完重启会被DHCP的配置覆盖,所以不能手动修改  在18~22发行版中,所有的dns解析请求都会被劫持到本地127的这个localdns。再由localdns向上游云厂商提供的dns请求解析。 在不改的情况下,
127.0.0.53:53的上游服务器是由云厂商dhcp服务器统一分配。这里100.100.2.x由阿里云分配而来  运行以下步骤以覆盖厂商 DNS 服务器值:
1)Netplan 通常将配置文件存储在 /etc/netplan 目录中。创建名为 /etc/netplan/dns.yaml 的文件,然后通过以下行填充此文件。请务必将占位符 DNS 服务器 IP 地址替换为首选地址:
cat <<EOF > /etc/netplan/dns.yaml
network:
    version: 2
    ethernets:
        eth0:
            nameservers:
                    search: [host.bilibili.co]
                    addresses: [172.22.xxx.xx, 10.66.xxx.xxx, 10.68.xxx.xxx]
            dhcp4-overrides:
                    use-dns: false
EOF
在进行这些更改后,仍然可以在 /etc/resolv.conf 中看到类似127.0.0.53。这是正常的。存根解析程序 IP 对于您的操作系统来说是本地的,在后台中,存根解析程序将使用您在前述 dns.yaml 文件中指定的 DNS 服务器。
2)重启服务器或运行 netplan apply 使生效
 符合预期
符合预期
ubuntu 22验证方法 
Debian系列 8~11
debian的 /etc/resolv.conf配置文件中 也提示我们不要直接修改这个文件。  它是一个软链接,指向
 /run/resolvconf 目录下的“真实文件”。该文件是在系统启动时生成的;同时也是注释告诉我们不要直接修改该文件的原因。
经过了解,在网卡启动或机器启动时。系统中的dhclient程序即dhcp客户端。会向厂商的虚拟交换机发送dhcp请求获得网卡的 ip 网关 dns 等信息,并覆盖/etc/resolvconf/run/resolv.conf 文件。大致流程如下图: 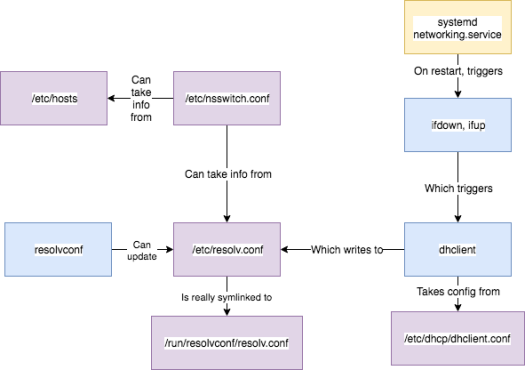 1)这里可以修改dhclient配置文件达到修改dns的目的,运行以下步骤以覆盖厂商 DNS 服务器值:
echo "supersede domain-name-servers 172.22.xxx.xxx,10.66.xxx.xxx,10.68.xxx.xxx;" >> /etc/dhcp/dhclient.conf
echo 'supersede domain-name "xxx.bilibili.xxx";' >> /etc/dhcp/dhclient.conf
2)重启网络服务或重启服务器使生效 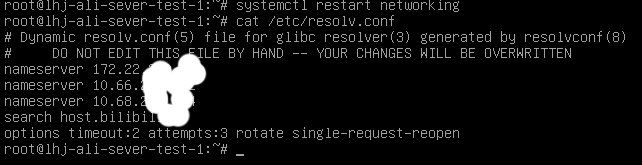
CentOS 7
默认情况下,由 NetworkManager 服务管理 resolv.conf 文件。该服务会通过 DHCP 提供的 DNS 服务器填充此文件。
方案1(推荐): 这里简单操作可以使用如下步骤,写入配置并锁定文件实现:
vi /etc/resolv.conf
nameserver 172.22.xxx.xxx
nameserver 10.66.xxx.xxx
nameserver 10.68.xxx.xxx

chattr +i /etc/dhcp/dhclient.conf
lsattr /etc/dhcp/dhclient.conf
方案2: 参照debian方案实现自定义dns
还需:在每个接口的配置文件 (/etc/sysconfig/network-scripts/ifcfg-*) 中将 PEERDNS 参数设置为 yes。
*方案3: 修改NetworkManager配置,阻止其接管 resolv.conf 文件
1)使用以下内容创建 /etc/NetworkManager/conf.d/disable-resolve.conf-managing.conf 文件:
[main]
dns=none
整理成脚本
#!/bin/bash
# 脚本支持Debian8~11 Ubuntu16~22 CentOS7 私有dns修改和配置锁定
Netplan(){
cat <<EOF > /etc/netplan/dns.yaml
network:
    version: 2
    ethernets:
        eth0:
            nameservers:
                    addresses: [172.22.xxx.xxx, 10.66.xxx.xxx, 10.68.xxx.xxx]
            dhcp4-overrides:
                    use-dns: false
EOF
return $?
}

Dhclient(){
#查找是否存在配置,不存在则写入
grep "bilibili.co" /etc/dhcp/dhclient.conf
if [ $? -eq 0 ];then
    echo "配置已存在"
else
    echo "" >> /etc/dhcp/dhclient.conf &&\
    echo "supersede domain-name-servers 172.22.xxx.xxx,10.66.xxx.xxx,10.68.xxx.xxx;" >> /etc/dhcp/dhclient.conf &&\
    echo 'supersede domain-name "host.bilibili.co";' >> /etc/dhcp/dhclient.conf &&\
    echo "dns写入成功"
fi
return $?
}

Ubuntu(){
    #如果系统版本大于等于18,那么执行netplan修改dns,
    if [ `echo "$os_version >= 18" | bc` -eq 1 ];then
        echo "系统为${os}系统版本为${os_version},即将修改配置netplan"
        Netplan && netplan apply &&\
        chattr +i /etc/netplan/dns.yaml #锁定配置
    else
    #小于18版本的执行修改dhclient的配置文件
        echo "系统为${os}系统版本为${os_version},即将修改dhclient配置文件"
        Dhclient && systemctl restart networking &&\
        chattr +i /etc/dhcp/dhclient.conf #锁定配置
    fi
}

Debian(){
        echo "系统为$os,即将修改dhclient配置文件"
        Dhclient && systemctl restart networking &&\
        chattr +i /etc/dhcp/dhclient.conf #锁定配置
}

Centos(){
\cp /etc/resolv.conf{,.bak}
cat >/etc/resolv.conf <<EOF
nameserver 172.22.xxx.xxx
nameserver 10.66.xxx.xxx
nameserver 10.68.xxx.xxx
options timeout:2 attempts:3 single-request-reopen
EOF
echo "系统为${os}系统版本为${os_version},即将修改/etc/resolv.conf"
chattr +i /etc/resolv.conf #锁定配置
return $?
}

main(){
    [ $(id -u) != "0" ] && echo "请使用root身份执行" && exit 1
    os=$(awk -F "[=\"]+" '$1~/^ID$/{print $2}' /etc/os-release)
    os_version=$(awk -F "[=\"]+" '$1~/^VERSION_ID$/{print $2}' /etc/os-release)
    case "$os" in
        centos)
        Centos
        ;;
        ubuntu)
        Ubuntu
        ;;
        debian)
        Debian
        ;;
    esac
}

main