水平拆分算法

范围分片:数据进行范围分割,分布到不同的节点上
范围分片
取模分片:通过将数据行的id值和节点数量进行取模得到的余数=节点编号(从0开始),从而实现将数据行平均分布到各个节点
取模分片
枚举分片:数据通过省市等等范围进行枚举分片。不同地区或者不同条件的数据归类到一个节点
枚举分片
时间分片:对数据按照时间进行归纳,分布到不同的节点上
时间分片

范围分片:

适用情况

  • (1)行数非常多,2000w(1-1000w:sh1 1000w01-2000w:sh2)
  • (2)访问非常频繁,用户访问较离散
1
2
3
4
5
6
7
8
9
10
11
12
13
14
15
16
17
18
19
20
21
22
23
24
25
26
27
28
29
30
31
32
33
34
35
36
37
38
39
40
41
42
43
44
45
46
47
48
49
50
51
52
53
54
55
56
57
58
59
60
61
62
63
64
65
66
//定义哪张表要被分片
[root@db02 /application/mycat/conf]# cat >schema.xml <<'EOF'
<?xml version="1.0"?>
<!DOCTYPE mycat:schema SYSTEM "schema.dtd">
<mycat:schema xmlns:mycat="http://io.mycat/">
<schema name="TESTDB" checkSQLschema="false" sqlMaxLimit="100" dataNode="sh1">
<table name="t3" dataNode="sh1,sh2" rule="auto-sharding-long" />
</schema>
<dataNode name="sh1" dataHost="oldguo1" database= "taobao" />
<dataNode name="sh2" dataHost="oldguo2" database= "taobao" />
<dataHost name="oldguo1" maxCon="1000" minCon="10" balance="1" writeType="0" dbType="mysql" dbDriver="native" switchType="1">
<heartbeat>select user()</heartbeat>
<writeHost host="db1" url="10.0.0.51:3307" user="root" password="123">
<readHost host="db2" url="10.0.0.51:3309" user="root" password="123" />
</writeHost>
<writeHost host="db3" url="10.0.0.52:3307" user="root" password="123">
<readHost host="db4" url="10.0.0.52:3309" user="root" password="123" />
</writeHost>
</dataHost>
<dataHost name="oldguo2" maxCon="1000" minCon="10" balance="1" writeType="0" dbType="mysql" dbDriver="native" switchType="1">
<heartbeat>select user()</heartbeat>
<writeHost host="db1" url="10.0.0.51:3308" user="root" password="123">
<readHost host="db2" url="10.0.0.51:3310" user="root" password="123" />
</writeHost>
<writeHost host="db3" url="10.0.0.52:3308" user="root" password="123">
<readHost host="db4" url="10.0.0.52:3310" user="root" password="123" />
</writeHost>
</dataHost>
</mycat:schema>
EOF

//配置文件第六行添加:
name="t3" //表名
dataNode="sh1,sh2" //节点名
rule="auto-sharding-long" //范围分片调用规则

[root@db02 /application/mycat/conf]# vim rule.xml
32 <tableRule name="auto-sharding-long">
33 <rule>
34 <columns>id</columns> //根据哪个列进行范围分片
35 <algorithm>rang-long</algorithm> //所调用的函数,找到地100行
36 </rule>
37 </tableRule>

100 <function name="rang-long"
101 class="io.mycat.route.function.AutoPartitionByLong">
102 <property name="mapFile">autopartition-long.txt</property> //控制范围分片的步长
103 </function>

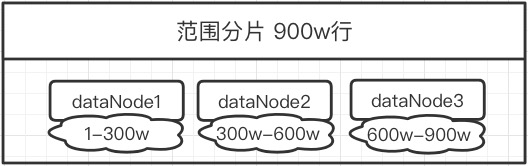
[root@db02 /application/mycat/conf]# vim autopartition-long.txt
1 # range start-end ,data node index
2 # K=1000,M=10000.
3 0-500M=0
4 500M-1000M=1
5 1000M-1500M=2
开始-结束=分片编号
例:1000w行-1500w行放在了第三个数据节点(编号为2)上了

[root@db02 /application/mycat/conf]# vim autopartition-long.txt
0-10=0
11-20=1
//这里我门设定步长为10进行范围分片

创建测试表(任意机器执行db1或db2):
mysql -S /data/3307/mysql.sock -e "use taobao;create table t3 (id int not null primary key auto_increment,name varchar(20) not null);"
mysql -S /data/3308/mysql.sock -e "use taobao;create table t3 (id int not null primary key auto_increment,name varchar(20) not null);"

重启mycat

1
2
3
4
[root@db02]# mycat restart
Stopping Mycat-server...
Stopped Mycat-server.
Starting Mycat-server...

插入测试数据

1
2
3
4
5
6
7
8
9
10
11
12
13
14
15
16
17
18
19
mysql -uroot -p123456 -h10.0.0.52 -P8066
mysql> use TESTDB;
mysql> show tables;
+------------------+
| Tables_in_taobao |
+------------------+
| t3 |
| user |
+------------------+
2 rows in set (0.00 sec)

insert into t3(id,name) values(1,'a');
insert into t3(id,name) values(2,'b');
insert into t3(id,name) values(3,'c');
insert into t3(id,name) values(4,'d');
insert into t3(id,name) values(11,'aa');
insert into t3(id,name) values(12,'bb');
insert into t3(id,name) values(13,'cc');
insert into t3(id,name) values(14,'dd');

检查物理节点

1
2
3
4
5
6
7
8
9
10
11
12
13
14
15
16
17
18
19
20
21
22
23
24
25
26
27
28
29
30
[root@db01 ~]# mysql -S /data/3307/mysql.sock -e "use taobao;show tables;select * from t3;"
+------------------+
| Tables_in_taobao |
+------------------+
| t3 |
| user |
+------------------+
+----+------+
| id | name |
+----+------+
| 1 | a |
| 2 | b |
| 3 | c |
| 4 | d |
+----+------+
[root@db01 ~]# mysql -S /data/3308/mysql.sock -e "use taobao;show tables;select * from t3;"
+------------------+
| Tables_in_taobao |
+------------------+
| order_t |
| t3 |
+------------------+
+----+------+
| id | name |
+----+------+
| 11 | aa |
| 12 | bb |
| 13 | cc |
| 14 | dd |
+----+------+

取模分片

适用情况

  • (1)适用于访问不离散的表
  • (2)分片键(一个列)与节点数量进行取余,得到余数,将数据写入对应节点
1
2
3
4
5
6
7
8
9
10
11
12
13
14
15
16
17
18
19
20
21
22
23
24
[root@db02 /application/mycat/conf]# vim schema.xml
4 <schema name="TESTDB" checkSQLschema="false" sqlMaxLimit="100" dataNode="sh1">
5 <table name="t4" dataNode="sh1,sh2" rule="mod-long" />
6 </schema>

<table name="t4" //表名
dataNode="sh1,sh2" //节点名
rule="mod-long" //取模分片调用的规则

38 <tableRule name="mod-long">
39 <rule>
40 <columns>id</columns> //分片列,负责与节点数进行取模运算
41 <algorithm>mod-long</algorithm> //取模分片所所调用的函数,找到104行
42 </rule>
43 </tableRule>

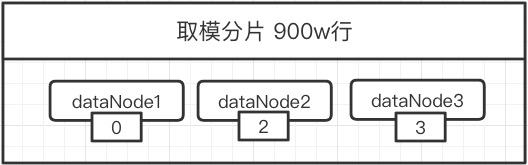
104 <function name="mod-long" class="io.mycat.route.function.PartitionByMod">
105 <!-- how many data nodes -->
106 <property name="count">2</property> //节点数量
107 </function>

创建测试表(任意机器执行db1或db2):
mysql -S /data/3307/mysql.sock -e "use taobao;create table t4 (id int not null primary key auto_increment,name varchar(20) not null);"
mysql -S /data/3308/mysql.sock -e "use taobao;create table t4 (id int not null primary key auto_increment,name varchar(20) not null);"

重启mycat (db02)

mycat restart

db02上添加测试数据

1
2
3
4
5
6
7
8
9
10
11
12
13
14
15
mysql -uroot -p123456 -h10.0.0.52 -P8066
use TESTDB
insert into t4(id,name) values(1,'a');
insert into t4(id,name) values(2,'b');
insert into t4(id,name) values(3,'c');
insert into t4(id,name) values(4,'d');

3307位sh1,应当为0号节点
3308为sh2,应当是1号节点

id值%节点数量=落在哪个节点上
1%2=1 //3308
2%2=0 //3307
3%2=1 //3308
4%2=0 //3307

检查后端数据节点

1
2
3
4
5
6
7
8
9
10
11
12
13
14
15
16
17
18
19
20
21
22
23
24
25
26
27
28
29
验证:
[root@db01 ~]# mysql -S /data/3308/mysql.sock -e "use taobao;show tables;select * from t4;"
+------------------+
| Tables_in_taobao |
+------------------+
| order_t |
| t3 |
| t4 |
+------------------+
+----+------+
| id | name |
+----+------+
| 1 | a |
| 3 | c |
+----+------+
[root@db01 ~]# mysql -S /data/3307/mysql.sock -e "use taobao;show tables;select * from t4;"
+------------------+
| Tables_in_taobao |
+------------------+
| t3 |
| t4 |
| user |
+------------------+
+----+------+
| id | name |
+----+------+
| 2 | b |
| 4 | d |
+----+------+

枚举分片

介绍

  • 适用于以地区或特定条件进行分类的数据表
    1
    2
    3
    4
    5
    6
    7
    t5 表
    id name telnum
    1 bj 1212
    2 sh 22222
    3 bj 3333
    4 sh 44444
    5 bj 5555

配置文件:

1
2
3
4
5
6
7
8
9
10
11
12
13
14
15
16
17
18
19
20
21
22
23
24
25
26
27
28
29
30
31
32
33
34
35
36
37
38
[root@db02 /application/mycat/conf]# vim schema.xml
4 <schema name="TESTDB" checkSQLschema="false" sqlMaxLimit="100" dataNode="sh1">
5 <table name="t5" dataNode="sh1,sh2" rule="sharding-by-intfile" /> //调用的规则
6 </schema>

[root@db02 /application/mycat/conf]# vim rule.xml
26 <tableRule name="sharding-by-intfile">
27 <rule>
28 <columns>name</columns> //定义参与枚举的列
29 <algorithm>hash-int</algorithm> //调用的函数
30 </rule>
31 </tableRule>

96 <function name="hash-int"
97 class="io.mycat.route.function.PartitionByFileMap">
98 <property name="mapFile">partition-hash-int.txt</property>
99 <property name="type">1</property> //让枚举列支持中英文,默认只支持数字
100 <property name="defaultNode">1</property> //未定义的枚举列默认放到1节点
101 </function>

按照schema.xml中的先后排序,
columns 标识将要分片的表字段,
algorithm 分片函数,
其中分片函数配置中,mapFile标识配置文件名称

[root@db02 /application/mycat/conf]# vim partition-hash-int.txt
1 bj=0
2 sh=1
3 #DEFAULT_NODE=1 //未定义的枚举列默认放到1节点,rule.xml中已经定义,这里不需要重复定义
name=bj 放到0节点
name=sh 放入1节点

创建测试表(任意机器执行db1或db2):
mysql -S /data/3307/mysql.sock -e "use taobao;create table t5 (id int not null primary key auto_increment,name varchar(20) not null);"
mysql -S /data/3308/mysql.sock -e "use taobao;create table t5 (id int not null primary key auto_increment,name varchar(20) not null);"

重启mycat
mycat restart

db02上添加测试数据

1
2
3
4
5
6
7
mysql -uroot -p123456 -h10.0.0.52 -P8066
use TESTDB
insert into t5(id,name) values(1,'bj');
insert into t5(id,name) values(2,'sh');
insert into t5(id,name) values(3,'bj');
insert into t5(id,name) values(4,'sh');
insert into t5(id,name) values(5,'tj');

检查后端数据节点

1
2
3
4
5
6
7
8
9
10
11
12
13
14
15
16
17
18
19
20
21
22
23
24
25
26
27
28
29
30
31
[root@db01 ~]# mysql -S /data/3307/mysql.sock -e "use taobao;show tables;select * from t5;"
+------------------+
| Tables_in_taobao |
+------------------+
| t3 |
| t4 |
| t5 |
| user |
+------------------+
+----+------+
| id | name |
+----+------+
| 1 | bj |
| 3 | bj |
| 5 | tj | //未定义的枚举列,默认放到了0节点中
+----+------+
[root@db01 ~]# mysql -S /data/3308/mysql.sock -e "use taobao;show tables;select * from t5;"
+------------------+
| Tables_in_taobao |
+------------------+
| order_t |
| t3 |
| t4 |
| t5 |
+------------------+
+----+------+
| id | name |
+----+------+
| 2 | sh |
| 4 | sh |
+----+------+

Mycat全局表

1
2
3
4
5
6
7
8
9
10
ta   tb   tc  td   
join
tx

select t1.name ,t.x from t1
join tx
select t2.name ,t.x from t2
join tx
select t3.name ,t.x from t3
join tx

使用场景:

  • 如果你的业务中有些数据类似于数据字典,比如配置文件的配置,常用业务的配置或者数据量不大很少变动的表,这些表往往不是特别大,而且大部分的业务场景都会用到,那么这种表适合于Mycat全局表,无须对数据进行切分。要在所有的分片上保存一份数据即可。

  • Mycat 在Join操作中,业务表与全局表进行Join聚合会优先选择相同分片内的全局表join,避免跨库Join,在进行数据插入操作时,mycat将把数据分发到全局表对应的所有分片执行,在进行数据读取时候将会随机获取一个节点读取数据。

全局表配置:

1
2
3
4
5
6
7
8
[root@db02 /application/mycat/conf]# vim schema.xml
4 <schema name="TESTDB" checkSQLschema="false" sqlMaxLimit="100" dataNode="sh1">
5 <table name="t_area" primaryKey="id" type="global" dataNode="sh1,sh2" />
6 </schema>

测试表准备:
mysql -S /data/3307/mysql.sock -e "use taobao;create table t_area (id int not null primary key auto_increment,name varchar(20) not null);"
mysql -S /data/3308/mysql.sock -e "use taobao;create table t_area (id int not null primary key auto_increment,name varchar(20) not null);"

重启mycat (db02)

mycat restart

插入测试数据

1
2
3
4
5
6
mysql -uroot -p123456 -h10.0.0.52 -P8066
use TESTDB
insert into t_area(id,name) values(1,'a');
insert into t_area(id,name) values(2,'b');
insert into t_area(id,name) values(3,'c');
insert into t_area(id,name) values(4,'d');

检查后端数据

1
2
3
4
5
6
7
8
9
10
11
12
13
14
15
16
17
18
//所以节点上都存在相同的全局表,而且数据一致
[root@db01 ~]# mysql -S /data/3307/mysql.sock -e "use taobao;select * from t_area;"+----+------+
| id | name |
+----+------+
| 1 | a |
| 2 | b |
| 3 | c |
| 4 | d |
+----+------+
[root@db01 ~]# mysql -S /data/3308/mysql.sock -e "use taobao;select * from t_area;"
+----+------+
| id | name |
+----+------+
| 1 | a |
| 2 | b |
| 3 | c |
| 4 | d |
+----+------+

E-R分片

说明:类似于全局表,但比全局表性能高。
例如:

1
2
3
4
5
6
7
8
9
10
11
12
13
14
15
16
17
A join B  
//将A 表和B表中相关连的条件,同时分片放入同一个节点中
为了防止跨分片join,可以使用E-R模式
A join B
on a.xx=b.yy
join C
on A.id=C.id

#分片策略 schema.xml
<table name="A" dataNode="sh1,sh2" rule="mod-long"> //比如说A表作为驱动表设定了取模分片
<childTable name="B" joinKey="yy" parentKey="xx" /> //将子表B同时也进行分片
</table>

joinKey="yy" //B表自己的关联条件
parentKey="xx" //驱动表A表的关联条件

将相关连的数据同时分片放到同一个节点

逻辑库操作

更改逻辑库默认名

1
2
3
4
5
6
7
8
9
10
11
12
13
14
15
16
17
18
19
20
21
22
23
24
25
26
27
28
29
30
31
32
33
34
35
36
37
38
39
1.schema.xml
<?xml version="1.0"?>
<!DOCTYPE mycat:schema SYSTEM "schema.dtd">
<mycat:schema xmlns:mycat="http://io.mycat/">
<schema name="pincheng" checkSQLschema="false" sqlMaxLimit="100" dataNode="sh1"> //更改逻辑库名
</schema>
<dataNode name="sh1" dataHost="oldguo1" database= "world" />
<dataHost name="oldguo1" maxCon="1000" minCon="10" balance="1" writeType="0" dbType="mysql" dbDriver="native" switchType="1">
<heartbeat>select user()</heartbeat>
<writeHost host="db1" url="10.0.0.51:3307" user="root" password="123">
<readHost host="db2" url="10.0.0.51:3309" user="root" password="123" />
</writeHost>
</dataHost>
</mycat:schema>

2.server.xml
101 <user name="root" defaultAccount="true">
102 <property name="password">123456</property>
103 <property name="schemas">pincheng</property> //这里
104
105 <!-- 表级 DML 权限设置 -->
106 <!--
107 <privileges check="false">
108 <schema name="TESTDB" dml="0110" >
109 <table name="tb01" dml="0000"></table>
110 <table name="tb02" dml="1111"></table>
111 </schema>
112 </privileges>
113 -->
114 </user>
115
116 <user name="user">
117 <property name="password">user</property>
118 <property name="schemas">pincheng</property> //这里
119 <property name="readOnly">true</property>
120 </user>

重启mycat
mycat restart

添加逻辑库

1
2
3
4
5
6
7
8
9
10
11
12
13
14
15
16
17
18
19
20
21
22
23
24
25
26
27
28
29
30
31
32
33
34
35
36
37
38
1.schema.xml
<?xml version="1.0"?>
<!DOCTYPE mycat:schema SYSTEM "schema.dtd">
<mycat:schema xmlns:mycat="http://io.mycat/">
<schema name="pincheng" checkSQLschema="false" sqlMaxLimit="100" dataNode="sh1">
</schema>
<schema name="felix" checkSQLschema="false" sqlMaxLimit="100" dataNode="sh1">
</schema>
<dataNode name="sh1" dataHost="oldguo1" database= "world" />
<dataHost name="oldguo1" maxCon="1000" minCon="10" balance="1" writeType="0" dbType="mysql" dbDriver="native" switchType="1">
<heartbeat>select user()</heartbeat>
<writeHost host="db1" url="10.0.0.51:3307" user="root" password="123">
<readHost host="db2" url="10.0.0.51:3309" user="root" password="123" />
</writeHost>
</dataHost>
</mycat:schema>

2.server.xml
101 <user name="root" defaultAccount="true">
102 <property name="password">123456</property>
103 <property name="schemas">pincheng,felix</property> //这里
104
105 <!-- 表级 DML 权限设置 -->
106 <!--
107 <privileges check="false">
108 <schema name="TESTDB" dml="0110" >
109 <table name="tb01" dml="0000"></table>
110 <table name="tb02" dml="1111"></table>
111 </schema>
112 </privileges>
113 -->
114 </user>
115
116 <user name="user">
117 <property name="password">user</property>
118 <property name="schemas">pincheng,felix</property> //这里
119 <property name="readOnly">true</property>
120 </user>

添加用户

1
2
3
4
5
6
7
8
9
10
11
12
13
14
15
16
17
18
19
20
21
22
23
24
25
26
27
28
29
30
31
32
33
34
35
36
37
38
39
40
41
1.server.xml 
101 <user name="root" defaultAccount="true">
102 <property name="password">123456</property>
103 <property name="schemas">pincheng</property>
104
105 <!-- 表级 DML 权限设置 -->
106 <!--
107 <privileges check="false">
108 <schema name="TESTDB" dml="0110" >
109 <table name="tb01" dml="0000"></table>
110 <table name="tb02" dml="1111"></table>
111 </schema>
112 </privileges>
113 -->
114 </user>
115
116 <user name="user">
117 <property name="password">user</property>
118 <property name="schemas">pincheng</property>
119 <property name="readOnly">true</property>
120 </user>

//添加5行
121 <user name="felix">//账号
122 <property name="password">felix</property>//密码
123 <property name="schemas">felix</property>
124 <property name="readOnly">true</property>//只读
125 </user>

[root@db02 /application/mycat/conf]# mycat restart
Stopping Mycat-server...
Stopped Mycat-server.
Starting Mycat-server...
[root@db02 /application/mycat/conf]# mysql -ufelix -pfelix -h10.0.0.52 -P8066
mysql> show databases;
+----------+
| DATABASE |
+----------+
| felix |
+----------+
1 row in set (0.01 sec)