Service服务访问 我们已经能够通过Deployment来创建一组Pod来提供具有高可用性的服务。虽然每个Pod都会分配一个单独的Pod IP,然而却存在如下两个问题:
Pod IP仅仅是集群内可见的虚拟IP,外部无法访问。
Pod IP会随着Pod的销毁而消失,当ReplicaSet对Pod进行动态伸缩时,Pod IP可能随时随地都会变化,这样对于我们访问这个服务带来了难度。
Service 负载均衡/Cluster IP service是一组pod的服务抽象,相当于一组pod的LB,负责将请求分发给对应的pod。service会为这个LB提供一个IP,一般称为cluster IP 。使用Service对象,通过selector进行标签选择,找到对应的Pod:
myblog/deployment/svc-myblog.yaml
1
2
3
4
5
6
7
8
9
10
11
12
13
apiVersion: v1 kind: Service metadata: name: myblog namespace: demo spec: ports: - port: 80 protocol: TCP targetPort: 8002 selector: app: myblog type: ClusterIP
操作演示:
1 2 3 4 5 6 7 8 9 10 11 12 13 14 15 16 17 18 19 20 21 22 23 24 25 26 27 28 29 30 31 32 33 34 35 36 37 38 39 40 41 42 43 $ $ kubectl create -f svc-myblog.yaml [root@k8s-master deployment] NAME READY STATUS RESTARTS AGE LABELS myblog-7fc47887f9-h5529 1/1 Running 1 44h app=myblog,pod-template-hash=7fc47887f9 myblog-7fc47887f9-k85mr 1/1 Running 1 44h app=myblog,pod-template-hash=7fc47887f9 myblog-7fc47887f9-v6qbf 1/1 Running 1 44h app=myblog,pod-template-hash=7fc47887f9 mysql-5fcb655cc9-q48f9 1/1 Running 1 47h app=mysql,pod-template-hash=5fcb655cc9 [root@k8s-master deployment] NAME TYPE CLUSTER-IP EXTERNAL-IP PORT(S) AGE myblog ClusterIP 10.100.226.216 <none> 80/TCP 76s [root@k8s-master deployment] NAME ENDPOINTS AGE myblog 10.244.0.5:8002,10.244.0.6:8002,10.244.0.7:8002 116s $ kubectl -n demo describe svc myblog Name: myblog Namespace: demo Labels: <none> Annotations: <none> Selector: app=myblog Type: ClusterIP IP: 10.100.226.216 Port: <unset > 80/TCP TargetPort: 8002/TCP Endpoints: 10.244.0.5:8002,10.244.0.6:8002,10.244.0.7:8002 Session Affinity: None Events: <none> $ kubectl -n demo scale deploy myblog --replicas=4 [root@k8s-master deployment] NAME ENDPOINTS AGE myblog 10.244.0.5:8002,10.244.0.6:8002,10.244.0.7:8002 + 1 more... 9m14s
Service与Pod如何关联?
Service Cluster-IP如何访问?
1
2
3
4
$ kubectl -n demo get svc myblog NAME TYPE CLUSTER-IP EXTERNAL-IP PORT(S) AGE myblog ClusterIP 10.100.226.216 <none> 80/TCP 12m $ curl 10.100.226.216/blog/index/
为mysql服务创建service:
1
2
3
4
5
6
7
8
9
10
11
12
13
apiVersion: v1 kind: Service metadata: name: mysql namespace: demo spec: ports: - port: 3306 protocol: TCP targetPort: 3306 selector: app: mysql type: ClusterIP
访问mysql:
1
2
3
4
5
6
7
[root@k8s-master deployment] NAME TYPE CLUSTER-IP EXTERNAL-IP PORT(S) AGE mysql ClusterIP 10.109.65.147 <none> 3306/TCP 4s root@k8s-master deployment] 5.7.33x l^cj��!��i%m'p|]6uE<mysql_native_password!��#08S01Got packets out of order
目前使用hostNetwork部署,通过宿主机ip+port访问,弊端:
服务使用hostNetwork,使得宿主机的端口大量暴漏,存在安全隐患
容易引发端口冲突
服务均属于k8s集群,尽可能使用k8s的网络访问,因此可以对目前myblog访问mysql的方式做改造:
为mysql创建一个固定clusterIp的Service,把clusterIp配置在myblog的环境变量中
利用集群服务发现的能力,组件之间通过service name来访问
服务发现 在k8s集群中,组件之间可以通过定义的Service名称实现通信。
演示服务发现:
1 2 3 4 5 6 7 8 9 10 11 12 13 14 15 16 17 18 19 20 21 22 23 24 25 26 27 28 29 30 31 32 33 34 35 36 37 38 39 40 41 42 43 44 $ kubectl -n demo get svc NAME TYPE CLUSTER-IP EXTERNAL-IP PORT(S) AGE myblog ClusterIP 10.100.226.216 <none> 80/TCP 22m mysql ClusterIP 10.109.65.147 <none> 3306/TCP 7m4s [root@k8s-master deployment] NAME READY STATUS RESTARTS AGE IP NODE myblog-7fc47887f9-h5529 1/1 Running 1 45h 10.244.0.7 k8s-master myblog-7fc47887f9-k85mr 1/1 Running 1 45h 10.244.0.6 k8s-master myblog-7fc47887f9-pc24g 1/1 Running 0 15m 10.244.0.8 k8s-master myblog-7fc47887f9-v6qbf 1/1 Running 1 45h 10.244.0.5 k8s-master mysql-5fcb655cc9-q48f9 1/1 Running 1 2d 192.168.56.20 k8s-slave1 $ kubectl -n demo exec -ti myblog-7fc47887f9-h5529 bash [root@myblog-7fc47887f9-h5529 myblog] 5.7.33�a@zCA\;��!��&>Jn'+L|emysql_native_password!��#08S01Got packets out of order [root@myblog-5c97d79cdb-j485f myblog]# curl myblog/blog/index/ 我的博客列表 # 查看容器内dns解析 [root@myblog-7fc47887f9-h5529 myblog]# cat /etc/resolv.conf nameserver 10.96.0.10 search demo.svc.cluster.local svc.cluster.local cluster.local www.tendawifi.com options ndots:5 [root@myblog-7fc47887f9-h5529 myblog]# curl mysql.demo.svc.cluster.local:3306 5.7.33sYx4mnio��!��;?Q"bk3`{o;\mysql_native_password!��#08S01Got packets out of order #自动拼接的搜索域 [root@myblog-7fc47887f9-h5529 myblog]# exit exit # 问,这个dns是哪来的,凭什么他能提供k8s集群内的解析 [root@k8s-master deployment]# kubectl -n kube-system get po | grep core coredns-58cc8c89f4-gnmdb 1/1 Running 7 15d coredns-58cc8c89f4-r9hlv 1/1 Running 7 15d 实际上是k8s中的coredns组件在提供的服务 # 也是通过Service和ENDPOINTS能力对k8s内提供的服务访问 [root@k8s-master deployment]# kubectl -n kube-system get svc NAME TYPE CLUSTER-IP EXTERNAL-IP PORT(S) AGE kube-dns ClusterIP 10.96.0.10 <none> 53/UDP,53/TCP,9153/TCP 15d
虽然podip和clusterip都不固定,但是service name是固定的,而且具有完全的跨集群可移植性,因此组件之间调用的同时,完全可以通过service name去通信,这样避免了大量的ip维护成本,使得服务的yaml模板更加简单。因此可以对mysql和myblog的部署进行优化改造:
mysql可以去掉hostNetwork部署,使得服务只暴漏在k8s集群内部网络
configMap中数据库地址可以换成Service(LB)名称,这样跨环境的时候,配置内容基本上可以保持不用变化
1
2
3
4
5
6
7
8
9
10
11
12
13
14
15
16
17
18
19
20
21
22
23
24
25
26
27
28
29
30
31
32
33
34
35
36
37
38
39
40
41
42
43
44
45
46
47
48
49
50
51
52
53
54
55
56
57
58
59
60
61
62
63
apiVersion: apps/v1 kind: Deployment metadata: name: mysql namespace: demo spec: replicas: 1 selector: matchLabels: app: mysql template: metadata: labels: app: mysql spec: volumes: - name: mysql-data hostPath: path: /opt/mysql/data nodeSelector: component: mysql containers: - name: mysql image: 192.168 .56 .10 :5000/mysql:5.7-utf8 args: - "--character-set-server=utf8" - "--collation-server=utf8_general_ci" ports: - containerPort: 3306 env: - name: MYSQL_USER valueFrom: secretKeyRef: name: myblog key: MYSQL_USER - name: MYSQL_PASSWD valueFrom: secretKeyRef: name: myblog key: MYSQL_PASSWD - name: MYSQL_DATABASE value: "myblog" resources: requests: memory: 100Mi cpu: 50m limits: memory: 500Mi cpu: 100m readinessProbe: tcpSocket: port: 3306 initialDelaySeconds: 5 periodSeconds: 10 livenessProbe: tcpSocket: port: 3306 initialDelaySeconds: 15 periodSeconds: 20 volumeMounts: - name: mysql-data mountPath: /var/lib/mysql
修改configmap.yaml
1
2
3
4
5
6
7
8
apiVersion: v1 kind: ConfigMap metadata: name: myblog namespace: demo data: MYSQL_HOST: "mysql" MYSQL_PORT: "3306"
1 2 3 4 5 6 7 8 9 10 11 12 13 14 15 16 17 18 19 20 21 22 23 24 $ kubectl taint nodes k8s-master smoke- node/k8s-master untainted $ kubectl taint nodes k8s-slave1 drunk- node/k8s-slave1 untainted $ kubectl taint nodes k8s-slave2 perm- node/k8s-slave2 untainted $ kubectl -n demo apply -f configmap.yaml configmap/myblog unchanged kubectl -n demo describe configmap myblog $ kubectl apply -f deploy-mysql.yaml $ kubectl -n demo scale deploy myblog --replicas=0 $ kubectl -n demo scale deploy myblog --replicas=3 $ kubectl -n demo exec -it myblog-7fc47887f9-5wwxs bash [root@myblog-7fc47887f9-5wwxs myblog] MYSQL_HOST=mysql
服务发现实现 CoreDNS是一个Go语言实现的链式插件DNS服务端,是CNCF成员,是一个高性能、易扩展的DNS服务端。
1
2
3
4
5
6
7
8
9
10
11
12
13
14
15
16
17
18
19
20
21
22
23
24
25
26
27
28
29
30
31
32
33
34
35
36
37
38
39
40
41
42
43
44
45
46
47
48
49
50
51
52
53
54
55
56
57
58
59
$ kubectl -n kube-system get po -o wide|grep dns coredns-58cc8c89f4-gnmdb 1/1 Running 7 15d 10.244.2.50 k8s-slave1 coredns-58cc8c89f4-r9hlv 1/1 Running 7 15d 10.244.2.49 k8s-slave1 [root@myblog-7fc47887f9-h5529 myblog] nameserver 10.96.0.10 search demo.svc.cluster.local svc.cluster.local cluster.local www.tendawifi.com options ndots:5 [root@myblog-7fc47887f9-h5529 myblog] 5.7.33sYx4mnio��!��;?Q"bk3`{o;\mysql_native_password!��#08S01Got packets out of order [root@myblog-7fc47887f9-h5529 myblog]# exit exit ## 从哪来 $ kubectl -n kube-system get svc NAME TYPE CLUSTER-IP EXTERNAL-IP PORT(S) AGE kube-dns ClusterIP 10.96.0.10 <none> 53/UDP,53/TCP,9153/TCP 15d ## 启动pod的时候,会把kube-dns服务的cluster-ip地址注入到pod的resolve解析配置中,同时添加对应的namespace的search域。 因此跨namespace通过service name访问的话,需要添加对应的namespace名称,匹配第二个搜索域svc.cluster.local service_name.namespace_name # 例如访问k8s系统级别的Service服务 [root@k8s-master deployment]# kubectl describe svc Name: kubernetes Namespace: default Labels: component=apiserver provider=kubernetes Annotations: <none> Selector: <none> Type: ClusterIP IP: 10.96.0.1 Port: https 443/TCP TargetPort: 6443/TCP Endpoints: 192.168.56.10:6443 Session Affinity: None Events: <none> # 跨namespace访问Service [root@myblog-7fc47887f9-5wwxs myblog]# curl https://kubernetes curl: (6) Could not resolve host: kubernetes; Unknown error [root@myblog-7fc47887f9-5wwxs myblog]# curl -k https://kubernetes.default { " kind": " Status", " apiVersion": " v1", " metadata": { }, " status": " Failure", " message": " forbidden: User \"system:anonymous\" cannot get path \"/\"", " reason": " Forbidden", " details": { }, " code": 403
Service负载均衡/NodePort cluster-ip为虚拟地址,只能在k8s集群内部进行访问,集群外部如果访问内部服务,实现方式之一为使用NodePort方式。NodePort会默认在 30000-32767 ,不指定的会随机使用其中一个。
myblog/deployment/svc-myblog-nodeport.yaml
1
2
3
4
5
6
7
8
9
10
11
12
13
apiVersion: v1 kind: Service metadata: name: myblog-np namespace: demo spec: ports: - port: 80 protocol: TCP targetPort: 8002 selector: app: myblog type : NodePort
查看并访问服务:
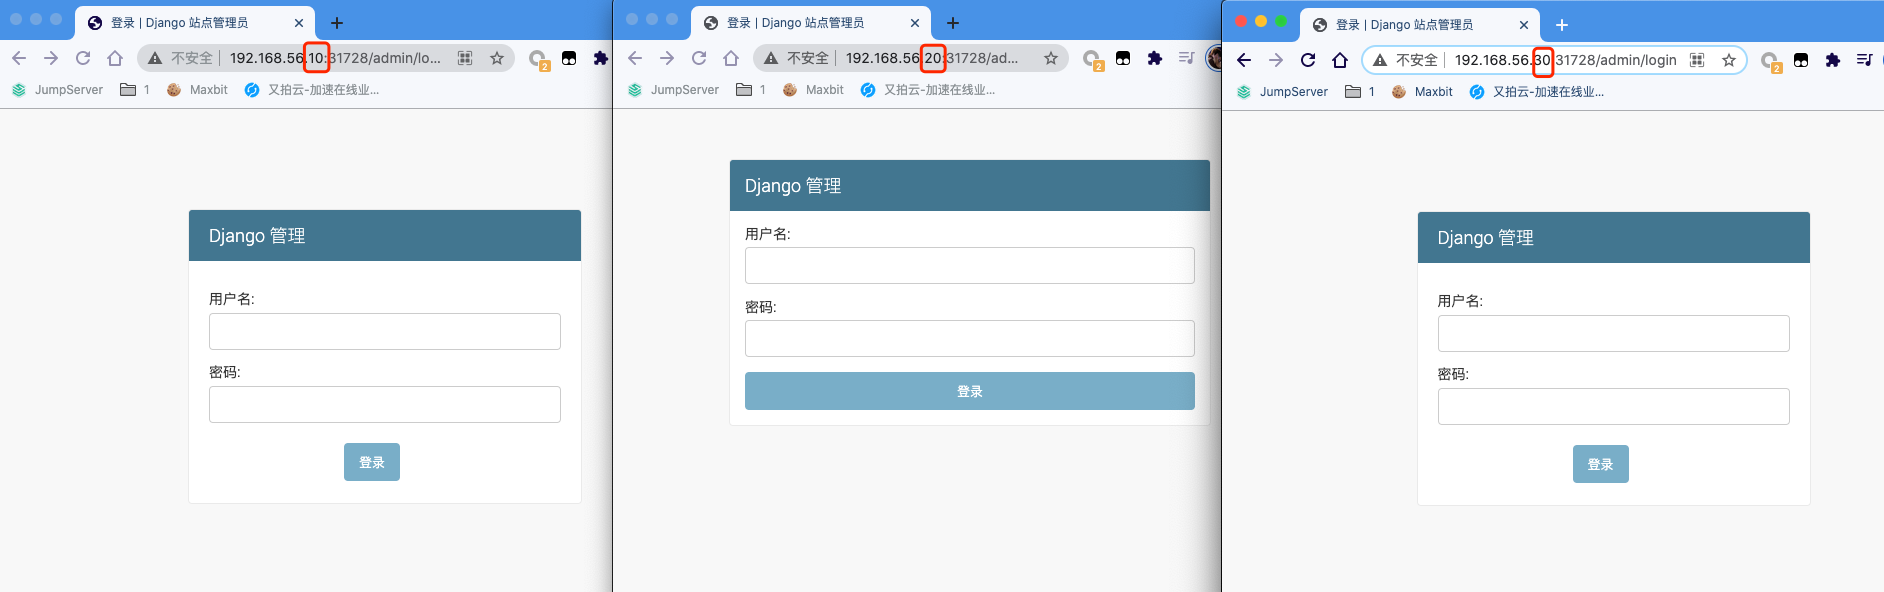
1
2
3
4
5
6
7
8
9
10
11
12
13
14
15
$ kubectl -n demo create -f svc-myblog-nodeport.yaml service/myblog-np created $ [root@k8s-master deployment] NAME TYPE CLUSTER-IP EXTERNAL-IP PORT(S) AGE myblog ClusterIP 10.100.226.216 <none> 80/TCP 87m myblog-np NodePort 10.103.170.13 <none> 80:31728/TCP 16s mysql ClusterIP 10.109.65.147 <none> 3306/TCP 72m [root@k8s-master deployment] tcp6 0 0 :::31728 :::* LISTEN 3179/kube-proxy [root@k8s-slave1 ~] tcp6 0 0 :::31728 :::* LISTEN 2339/kube-proxy [root@k8s-slave2 ~] tcp6 0 0 :::31728 :::* LISTEN 1909/kube-proxy
浏览器访问
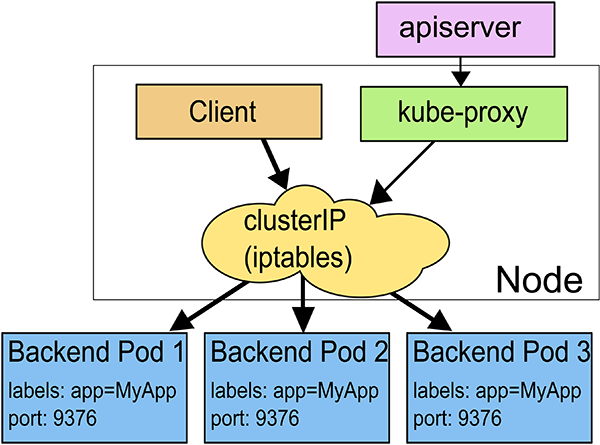
kube-proxy 运行在每个节点上,监听 API Server 中服务对象的变化,再通过创建流量路由规则来实现网络的转发。参照
参见:官方文档
有三种模式:
User space, 让 Kube-Proxy 在用户空间监听一个端口,所有的 Service 都转发到这个端口,然后 Kube-Proxy 在内部应用层对其进行转发 , 所有报文都走一遍用户态,性能不高,k8s v1.2版本后废弃。
Iptables, 当前默认模式,完全由 IPtables 来实现, 通过各个node节点上的iptables规则来实现service的负载均衡,但是随着service数量的增大,iptables模式由于线性查找匹配、全量更新等特点,其性能会显著下降。
IPVS, 与iptables同样基于Netfilter,但是采用的hash表,因此当service数量达到一定规模时,hash查表的速度优势就会显现出来,从而提高service的服务性能。 k8s 1.8版本开始引入,1.11版本开始稳定,需要开启宿主机的ipvs模块。
iptables模式示意图:
流量转发路径抓取
1
2
3
4
5
6
7
8
9
10
11
12
13
14
15
16
17
18
19
20
21
22
$ iptables-save |grep -v myblog-np|grep "demo/myblog" -A KUBE-SERVICES ! -s 10.244.0.0/16 -d 10.100.226.216/32 -p tcp -m comment --comment "demo/myblog: cluster IP" -m tcp --dport 80 -j KUBE-MARK-MASQ -A KUBE-SERVICES -d 10.100.226.216/32 -p tcp -m comment --comment "demo/myblog: cluster IP" -m tcp --dport 80 -j KUBE-SVC-WQNGJ7YFZKCTKPZK $ iptables-save |grep KUBE-SVC-WQNGJ7YFZKCTKPZK :KUBE-SVC-WQNGJ7YFZKCTKPZK - [0:0] -A KUBE-SERVICES -d 10.100.226.216/32 -p tcp -m comment --comment "demo/myblog: cluster IP" -m tcp --dport 80 -j KUBE-SVC-WQNGJ7YFZKCTKPZK -A KUBE-SVC-WQNGJ7YFZKCTKPZK -m statistic --mode random --probability 0.33332999982 -j KUBE-SEP-3T3R7W52EDXE5YWP -A KUBE-SVC-WQNGJ7YFZKCTKPZK -m statistic --mode random --probability 0.50000000000 -j KUBE-SEP-4P46YSTS2B3EDKRW -A KUBE-SVC-WQNGJ7YFZKCTKPZK -j KUBE-SEP-RZRWFU3D4FSY742B $ iptables-save |grep KUBE-SEP-4P46YSTS2B3EDKRW :KUBE-SEP-4P46YSTS2B3EDKRW - [0:0] -A KUBE-SEP-4P46YSTS2B3EDKRW -s 10.244.1.22/32 -j KUBE-MARK-MASQ -A KUBE-SEP-4P46YSTS2B3EDKRW -p tcp -m tcp -j DNAT --to-destination 10.244.1.22:8002 -A KUBE-SVC-WQNGJ7YFZKCTKPZK -m statistic --mode random --probability 0.50000000000 -j KUBE-SEP-4P46YSTS2B3EDKRW $ iptables-save |grep KUBE-SEP-3T3R7W52EDXE5YWP :KUBE-SEP-3T3R7W52EDXE5YWP - [0:0] -A KUBE-SEP-3T3R7W52EDXE5YWP -s 10.244.0.9/32 -j KUBE-MARK-MASQ -A KUBE-SEP-3T3R7W52EDXE5YWP -p tcp -m tcp -j DNAT --to-destination 10.244.0.9:8002 -A KUBE-SVC-WQNGJ7YFZKCTKPZK -m statistic --mode random --probability 0.33332999982 -j KUBE-SEP-3T3R7W52EDXE5YWP
Ingress服务访问 对于Kubernetes的Service,无论是Cluster-Ip和NodePort均是四层的负载,集群内的服务如何实现七层的负载均衡,这就需要借助于Ingress,Ingress控制器的实现方式有很多,比如nginx, Contour, Haproxy, trafik, Istio,我们以nginx的实现为例做演示。
Ingress-nginx是7层的负载均衡器 ,负责统一管理外部对k8s cluster中service的请求。主要包含:
ingress-nginx-controller:根据用户编写的ingress规则(创建的ingress的yaml文件),动态的去更改nginx服务的配置文件,并且reload重载使其生效(是自动化的,通过lua脚本来实现);
ingress资源对象:将Nginx的配置抽象成一个Ingress对象,每添加一个新的Service资源对象只需写一个新的Ingress规则的yaml文件即可(或修改已存在的ingress规则的yaml文件)
示意图:
实现逻辑
ingress controller通过和kubernetes api交互,动态的去感知集群中ingress规则变化
然后读取ingress规则(规则就是写明了哪个域名对应哪个service),按照自定义的规则,生成一段nginx配置
再写到nginx-ingress-controller的pod里,这个Ingress controller的pod里运行着一个Nginx服务,控制器把生成的nginx配置写入/etc/nginx.conf文件中
然后reload一下使配置生效。以此达到域名分别配置和动态更新的问题。
Ingress安装 参见:官方文档
1 2 3 4 5 6 7 8 9 10 11 12 13 14 15 16 17 18 19 20 21 22 23 24 25 26 27 28 29 30 31 32 33 34 35 36 37 38 39 40 41 42 43 44 45 46 47 $ kubectl label node k8s-slave1 ingress=true node/k8s-slave1 labeled wget https://raw.githubusercontent.com/kubernetes/ingress-nginx/nginx-0.30.0/deploy/static/mandatory.yaml 或者使用myblog/deployment/ingress/mandatory.yaml ... 212 spec: 213 hostNetwork: true 214 215 terminationGracePeriodSeconds: 300 216 serviceAccountName: nginx-ingress-serviceaccount 217 nodeSelector: 218 ingress: "true" 219 containers: ... 安装ingress $ kubectl create -f mandatory.yaml $ kubectl -n ingress-nginx get po -o wide NAME READY STATUS RESTARTS AGE IP NODE nginx-ingress-controller-766b7d9f4-bprq8 1/1 Running 0 7s 192.168.56.20 k8s-slave1 $ vi myblog/deployment/ingress.yaml apiVersion: extensions/v1beta1 kind: Ingress metadata: name: myblog namespace: demo spec: rules: - host: test.cakepanit.com http: paths: - path: / backend: serviceName: myblog servicePort: 80 $ kubectl create -f ingress.yaml $ felix@MacBook ~ % sudo vim /etc/hosts Password: felix@MacBook ~ % cat /etc/hosts 192.168.56.20 test.cakepanit.com
访问测试
ingress-nginx动态生成upstream配置
1
2
3
4
5
6
7
8
9
10
11
12
13
14
15
16
17
18
19
20
$ kubectl -n ingress-nginx get po $ kubectl -n ingress-nginx exec -it nginx-ingress-controller-766b7d9f4-bprq8 bash $ cat nginx.conf ... server { server_name test.cakepanit.com ; listen 80 ; listen [::]:80 ; listen 443 ssl http2 ; listen [::]:443 ssl http2 ; set $proxy_upstream_name "-" ; ssl_certificate_by_lua_block { certificate.call() } location / { ...
HTTPS访问:
1 2 3 4 5 $ openssl req -x509 -nodes -days 2920 -newkey rsa:2048 -keyout tls.key -out tls.crt -subj "/CN=*.devops.cn/O=ingress-nginx" $ kubectl -n demo create secret tls https-secret --key tls.key --cert tls.crt
修改yaml
1
2
3
4
5
6
7
8
9
10
11
12
13
14
15
16
17
18
apiVersion: extensions/v1beta1 kind: Ingress metadata: name: myblog-tls namespace: demo spec: rules: - host: test.cakepanit.com http: paths: - path: / backend: serviceName: myblog servicePort: 80 tls: - hosts: - test.cakepanit.com secretName: https-secret
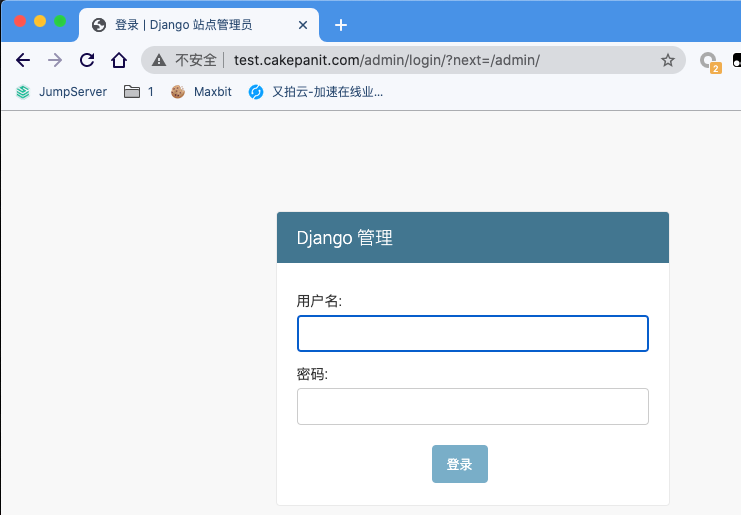
然后,访问 https://test.cakepanit.com/admin/

 狗狗币(DogeCoin)
 比特币(BitCoin)